The story so far 2.0ltr Titanium silver

Re: The story so far 2.0ltr Titanium silver
Nice work dude..... Love the car covers
-
Southernboy

- Joined: Thu 07 Oct, 2010 12:39
- Posts: 6437


- Location: Johannesburg
Re: The story so far 2.0ltr Titanium silver
One of the sweetest finishes!!

-
shantybeater
- Joined: Wed 12 Mar, 2008 14:33
- Posts: 1967


- Location: UK
Re: The story so far 2.0ltr Titanium silver
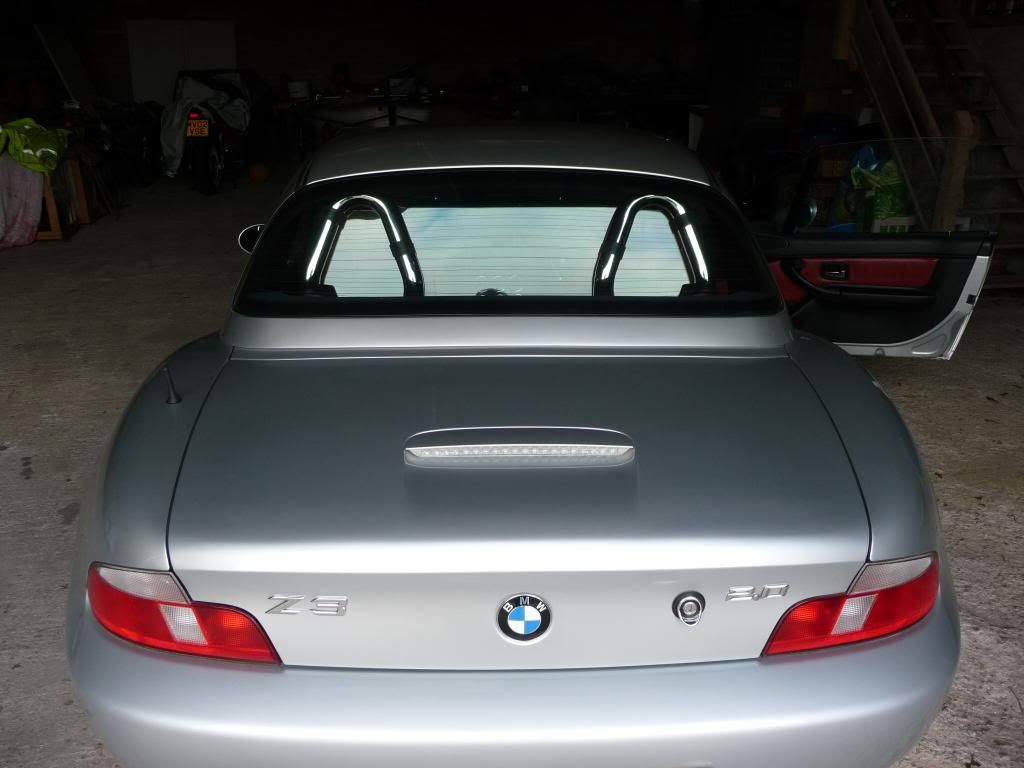
Wind deflector looks top notch, as good if not better than a certain very expensive article. How much did it cost out of interest?
Progress Thread:http://www.zroadster.net/forum/viewtopi ... 32&t=36117
Previous - S54 M Roadster, S50 M Roadster, Ibiza Cupra IHI 340bhp, Ibiza Cupra K04 270bhp, 6n2 Polo GTi


Re: The story so far 2.0ltr Titanium silver
With the straps I bought from justroadster £20 totalshantybeater wrote:Wind deflector looks top notch, as good if not better than a certain very expensive article. How much did it cost out of interest?

-
shantybeater
- Joined: Wed 12 Mar, 2008 14:33
- Posts: 1967
-
- Location: UK
Re: The story so far 2.0ltr Titanium silver
You really should consider offering them out, you'd be able to sell them for a very fair price and make some profit for your troubles
Progress Thread:http://www.zroadster.net/forum/viewtopi ... 32&t=36117
Previous - S54 M Roadster, S50 M Roadster, Ibiza Cupra IHI 340bhp, Ibiza Cupra K04 270bhp, 6n2 Polo GTi
Re: The story so far 2.0ltr Titanium silver
I suppose it would be easier enough for the standard hoops as they are fixed as such. The problem with the chrome and the AC Schnitzer ones is the variation in height when people fit them 
-
shantybeater
- Joined: Wed 12 Mar, 2008 14:33
- Posts: 1967
-
- Location: UK
Re: The story so far 2.0ltr Titanium silver
Good point, I forgot about that! I reckon a fair few with standard hoops will be after one though!
Progress Thread:http://www.zroadster.net/forum/viewtopi ... 32&t=36117
Previous - S54 M Roadster, S50 M Roadster, Ibiza Cupra IHI 340bhp, Ibiza Cupra K04 270bhp, 6n2 Polo GTi
Re: The story so far 2.0ltr Titanium silver
-
shantybeater
- Joined: Wed 12 Mar, 2008 14:33
- Posts: 1967
-
- Location: UK
Re: The story so far 2.0ltr Titanium silver
I don't think £50-£60 would be unreasonable? Lets put it this way I would have bought one from you for that price and felt good about it. The alternative is £100+!!
Perhaps offer a group buy and see what interest you get?
Perhaps offer a group buy and see what interest you get?
Progress Thread:http://www.zroadster.net/forum/viewtopi ... 32&t=36117
Previous - S54 M Roadster, S50 M Roadster, Ibiza Cupra IHI 340bhp, Ibiza Cupra K04 270bhp, 6n2 Polo GTi
Re: The story so far 2.0ltr Titanium silver
For the first time since i got the Z it got no presents from the Mrs for Christmas  So it was up to me to treat it
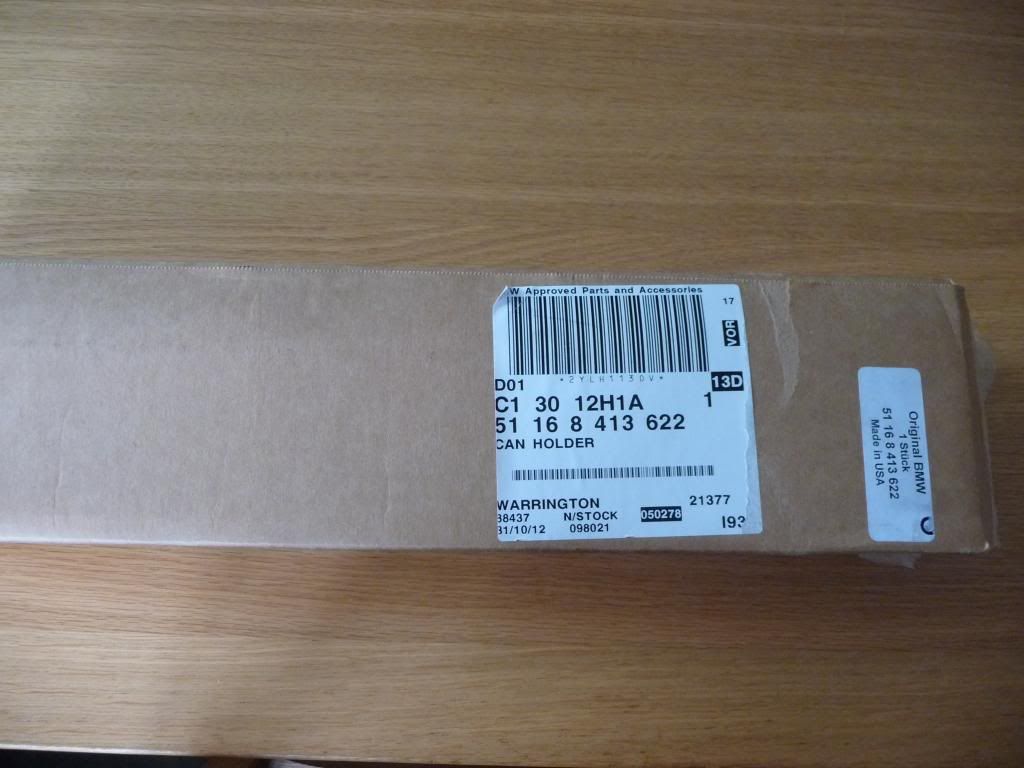
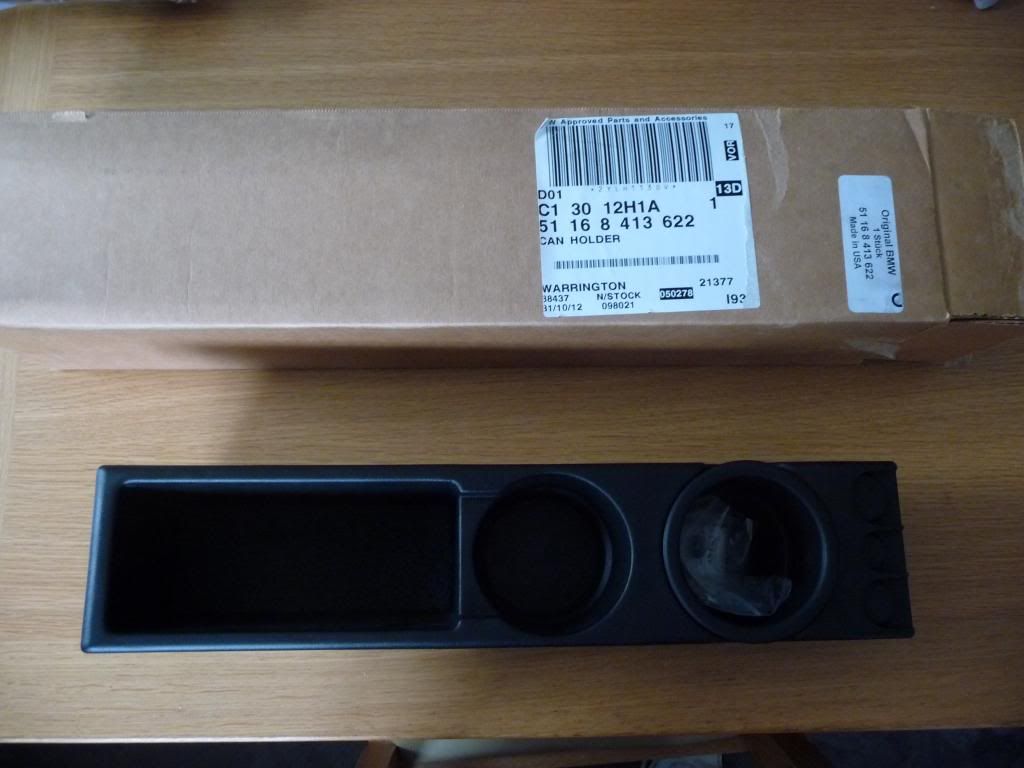
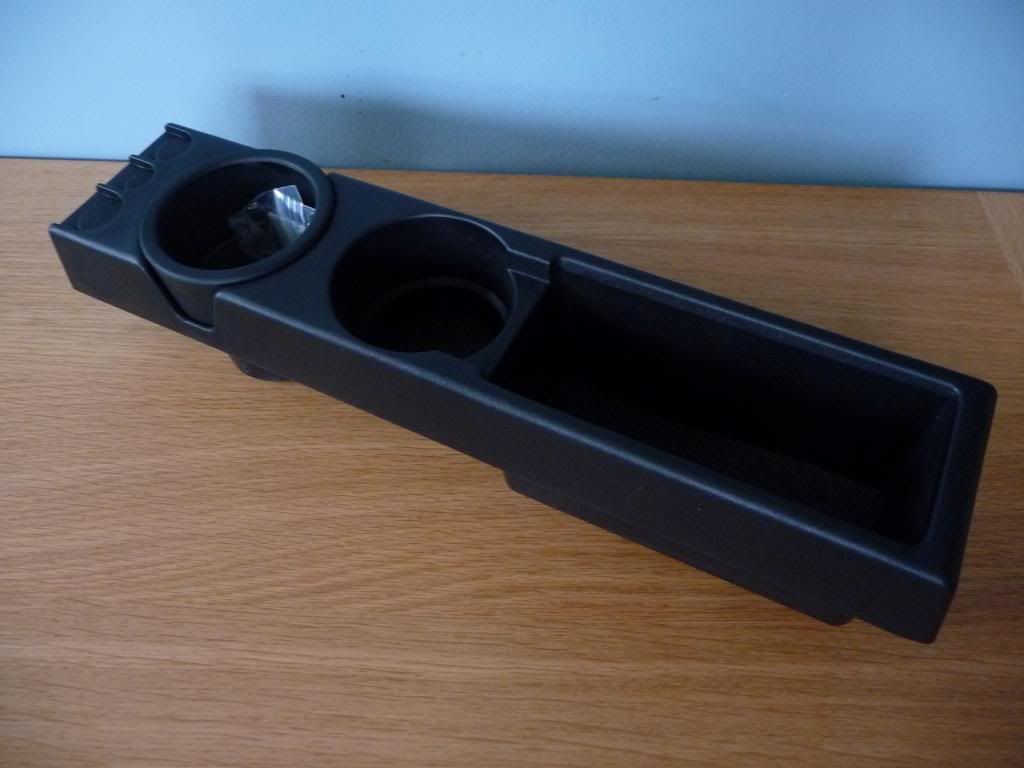
Firstly was the cup holder, i'd been looking on eBay for a while and seen second hand ones go for anything upto £90 and so i'd always resisted but then chanced upon the actual price from the dealer new £58!! ordered and in the dealership by 1pm the next day. I'm going to make the armrest and get it upholstered by the same guy that covered my console in Alcantara as I want to make sure that the red matches the seats and dashboard etc.
I've also been on the lookout for a set of ///M Gills, and when someone was breaking an ///M on eBay I managed to pick these up for £100 cash (Thanks must go to M3BMC who picked them up for me as he was getting some bits too). I've stripped them down and cleaned them, i'll be filling the ///M before spraying.
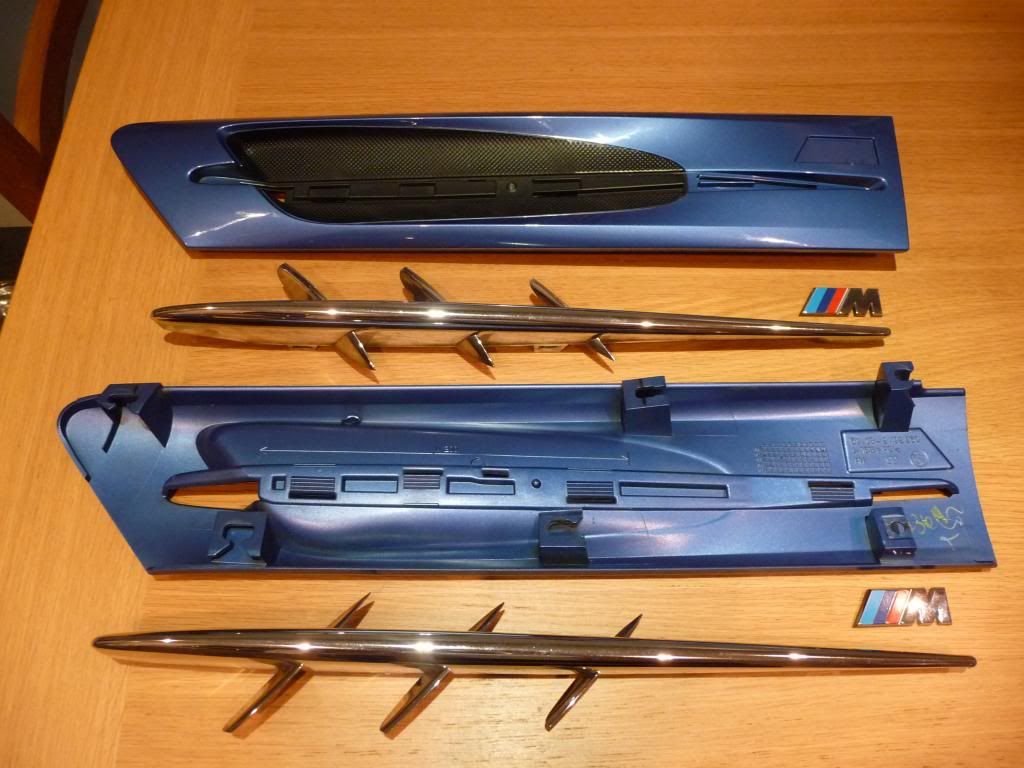
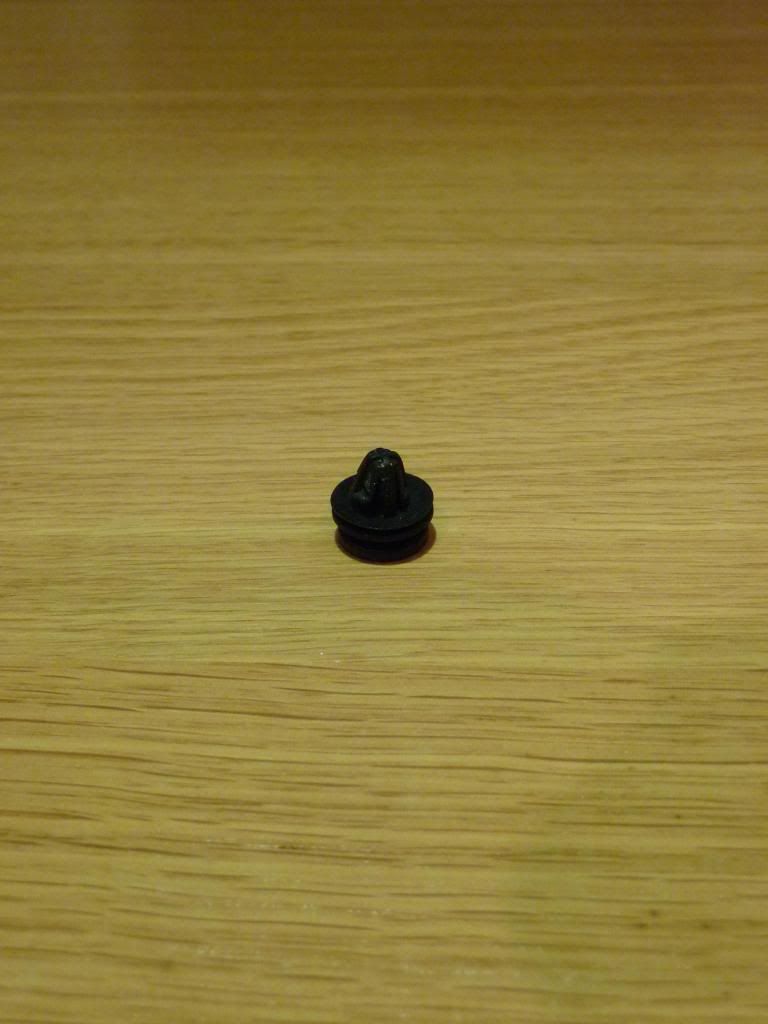
There are some tiny pieces of plastic that hold the chrome part in place, due to their age a few of these broke as i removed them so a quick phone call to the dealer and replacements were ordered.
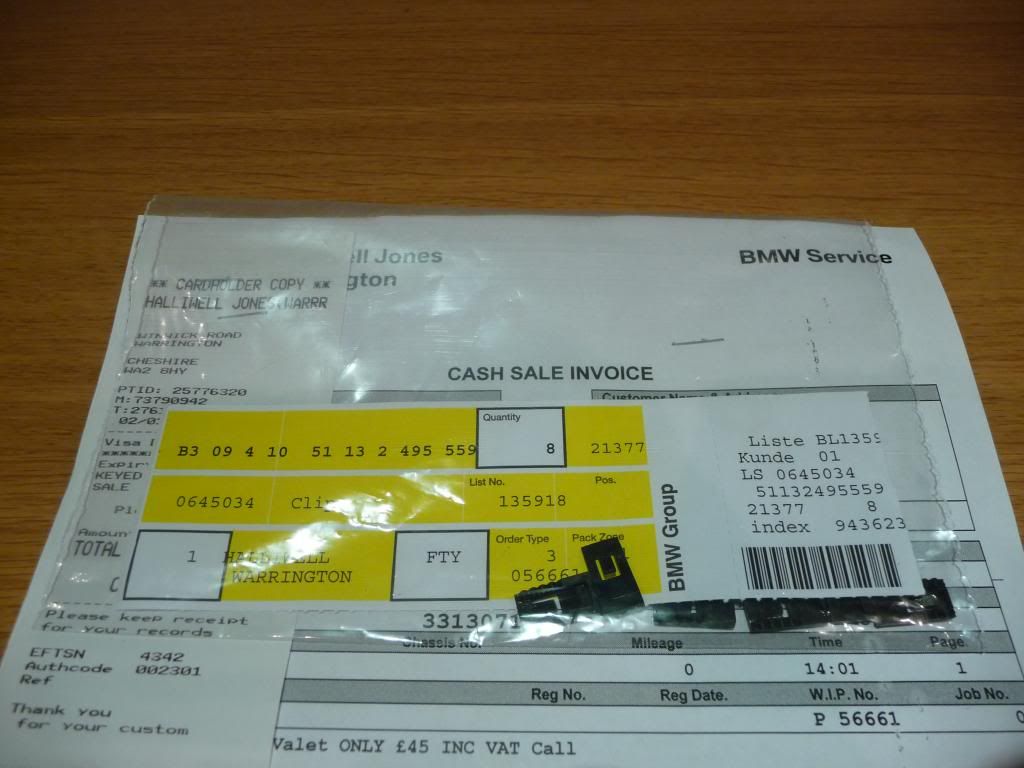
Eight tiny clips £8.45
The small clips that are the same as the door card clips but smaller and hold the gills in place £4 each and minimum order of TEN!!!!
Didn't order them
I don't know why but it appears that whatever I decide to buy at the minute has been discontinued Justroadster stopped the AC Schnitzer wind deflector just as i got the hoops, and have stopped the centre armrest too
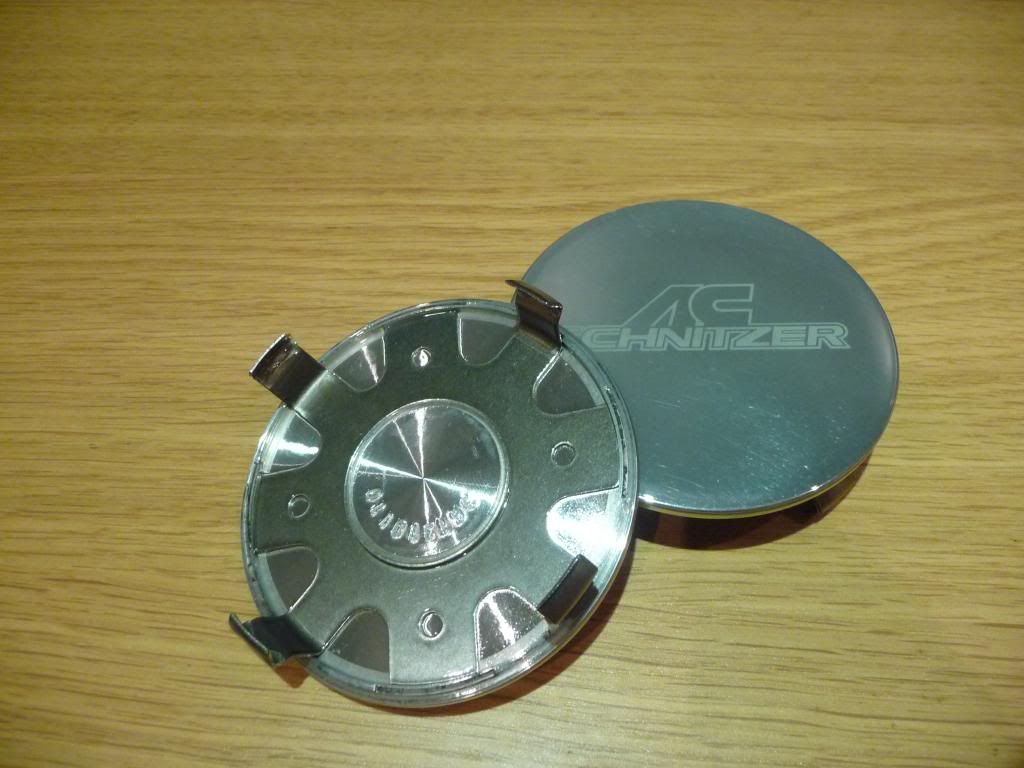
This trend has continued, When i got the Schnitzer type iii racing alloys i deliberated over the centre caps I had the standard silver plastic ACS type but thought an upgrade could wait until I fitted them when the car is back on the road and unsorn'd.
I liked the schwarz centre cap
But couldn't find them anywhere Which left the polished aluminium type £26 each from Rossiters. So a quick phone call to them and all sorted, unfortunately not they had TWO! and said they are now discontinued. Emails to ACS in Germany, US and others all provided the same sad news so the hunt began.
Needless to say i didnt buy these, eventually i found two on ebay in America but they won't ship over here so i've had get them sent to a distant relative in Connecticut who will post them on.
The Rossiters ones arrived in double quick time
So a few jobs to get on with for the next couple of months before the car is back on the road
Firstly was the cup holder, i'd been looking on eBay for a while and seen second hand ones go for anything upto £90
I've also been on the lookout for a set of ///M Gills, and when someone was breaking an ///M on eBay I managed to pick these up for £100 cash (Thanks must go to M3BMC who picked them up for me as he was getting some bits too). I've stripped them down and cleaned them, i'll be filling the ///M before spraying.
There are some tiny pieces of plastic that hold the chrome part in place, due to their age a few of these broke as i removed them so a quick phone call to the dealer and replacements were ordered.
Eight tiny clips £8.45
The small clips that are the same as the door card clips but smaller and hold the gills in place £4 each and minimum order of TEN!!!!
Didn't order them
I don't know why but it appears that whatever I decide to buy at the minute has been discontinued
This trend has continued, When i got the Schnitzer type iii racing alloys i deliberated over the centre caps
I liked the schwarz centre cap
But couldn't find them anywhere
Needless to say i didnt buy these, eventually i found two on ebay in America but they won't ship over here so i've had get them sent to a distant relative in Connecticut who will post them on.
The Rossiters ones arrived in double quick time
So a few jobs to get on with for the next couple of months before the car is back on the road
Last edited by ('_')Z3 on Sat 05 Jan, 2013 22:48, edited 2 times in total.


Re: The story so far 2.0ltr Titanium silver
Glad you managed to sort out the correct centre caps. Makes my spares worth a fair bit in the future now they have stopped making them
Re: The story so far 2.0ltr Titanium silver
The term 'rocking horse poo' was invented for these centre capsJonttt wrote:Glad you managed to sort out the correct centre caps. Makes my spares worth a fair bit in the future now they have stopped making them
Re: The story so far 2.0ltr Titanium silver
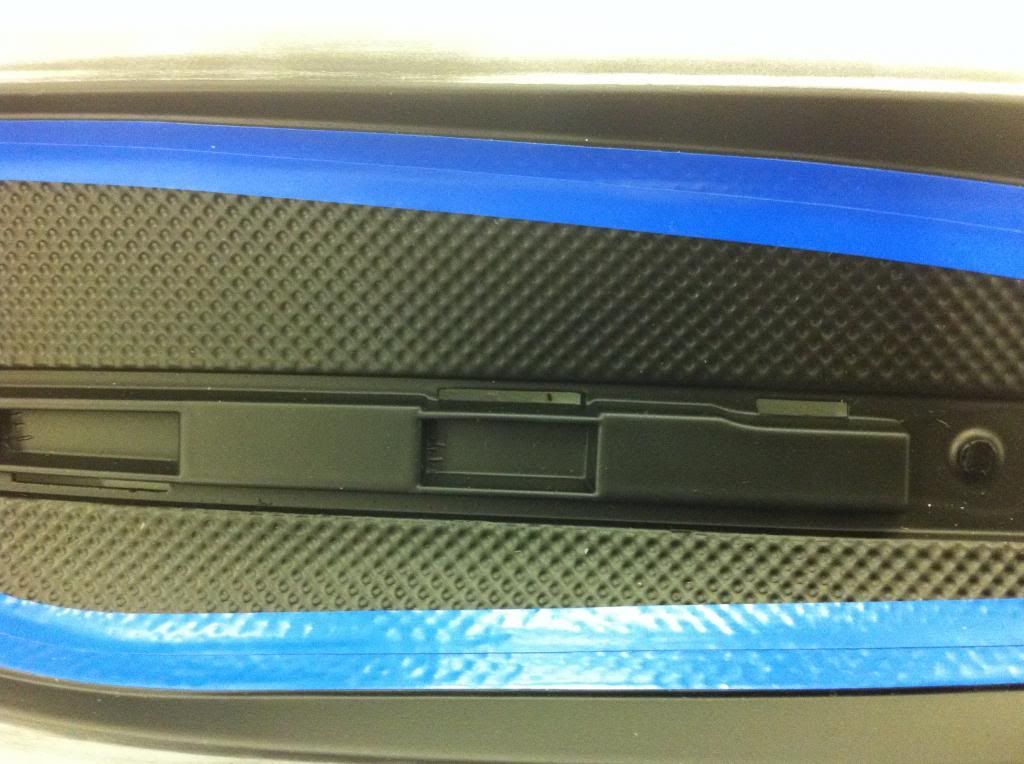
Started the ///M vents yesterday, I started by filling and sanding the ///M recess.
And given them both a few coats of primer and a light sand down with wet and dry.

Next i'll be spraying the black mesh part on the advice of DAZ3 before masking this section and spraying the glorious titanium silver
Has anyone any advice on masking? best tape etc
And given them both a few coats of primer and a light sand down with wet and dry.
Next i'll be spraying the black mesh part on the advice of DAZ3 before masking this section and spraying the glorious titanium silver
Has anyone any advice on masking? best tape etc
Re: The story so far 2.0ltr Titanium silver
May I ask what filler you have used? I've redone mine twice and got sinking around the filler.
99 2.0 Topaz Individual
Re: The story so far 2.0ltr Titanium silver
http://www.halfords.com/webapp/wcs/stor ... yId_165625
I used this stuff, it went on really well to the painted surface. I sanded the recess a bit just so it would key a bit better, its all been sprayed in primer and sanded again. I've been and bought the matt black and lacquer tonight but need to order the titanium.
I used this stuff, it went on really well to the painted surface. I sanded the recess a bit just so it would key a bit better, its all been sprayed in primer and sanded again. I've been and bought the matt black and lacquer tonight but need to order the titanium.


Re: The story so far 2.0ltr Titanium silver
There a real pain to mask up (well I thought they were) but just have patience and stay calm, good luck and they'll be worth it in the end.

Re: The story so far 2.0ltr Titanium silver
I stupidly thought before I bought them that the mesh part was a separate piece that clipped in to placeDaz3 wrote:There a real pain to mask up (well I thought they were) but just have patience and stay calm, good luck and they'll be worth it in the end.
Re: The story so far 2.0ltr Titanium silver
I thought there where only two types of centre caps for these ie the none sport plastic ones and the type III sport metal ones (according to the original parts catalogue) I think they appear darker in the pic than they really are as they are a different metal finish than the wheels. Mine appear darker in some pics than others depending on light angles.('_')Z3 wrote: When i got the Schnitzer type iii racing alloys i deliberated over the centre caps
I liked the schwarz centre cap
But couldn't find them anywhere
Needless to say i didnt buy these, eventually i found two on ebay in America but they won't ship over here so i've had get them sent to a distant relative in Connecticut who will post them on.
The Rossiters ones arrived in double quick time
So a few jobs to get on with for the next couple of months before the car is back on the road
They may have done a darker version for other wheels but I can't ever remember seeing any in the parts catalogue. I presume the ones you got from Rossitors are silver and not as dark as they look in the picture ?
Re: The story so far 2.0ltr Titanium silver
('_')Z3 wrote:I hate masking, you spray it all think you've got a great finish only to remove all the masking to reveal a dusting of overspray or find its bled. And to cap it all patience is not something I've got in abundanceDaz3 wrote:There a real pain to mask up (well I thought they were) but just have patience and stay calm, good luck and they'll be worth it in the end.
just give them to me, I will save you all that frustration.
ps don't expect them back though......

Z3 2.8 Progress Journal (Mine)
Z3 1.9 Sport Progress Journal (Wifey's)
I have an element of 'M-styling' on my car, If that's a good enough reason for the manufacturers to adorn a 320 with the M badge, then its certainly a good enough reason for me..


Re: The story so far 2.0ltr Titanium silver
the modifications youve made are absolutely astounding. love it!

Re: The story so far 2.0ltr Titanium silver
the modifications youve made are absolutely astounding. love it!
Thanks!!
Well i decided not to take Gookah up on his kind and generous offer
I've really tried to take my time with them to let the paint properly harden between coats
I started by spraying the matt black, like i said earlier i thought the mesh part was a seperate part but unfortunately not DAZ3 suggested spraying this part first rather than the silver. I have to say the cost of paints is astronomical and i wonder if it would have been as cheap to get them done at prospray in Rixton who did my ///M mirrrors but that would have removed some of the fun
Once the black was dry i masked with this 3M tape (again thanks Daz for the recommendation)
And then i filled in the missing bit with paper and then taped that down too.
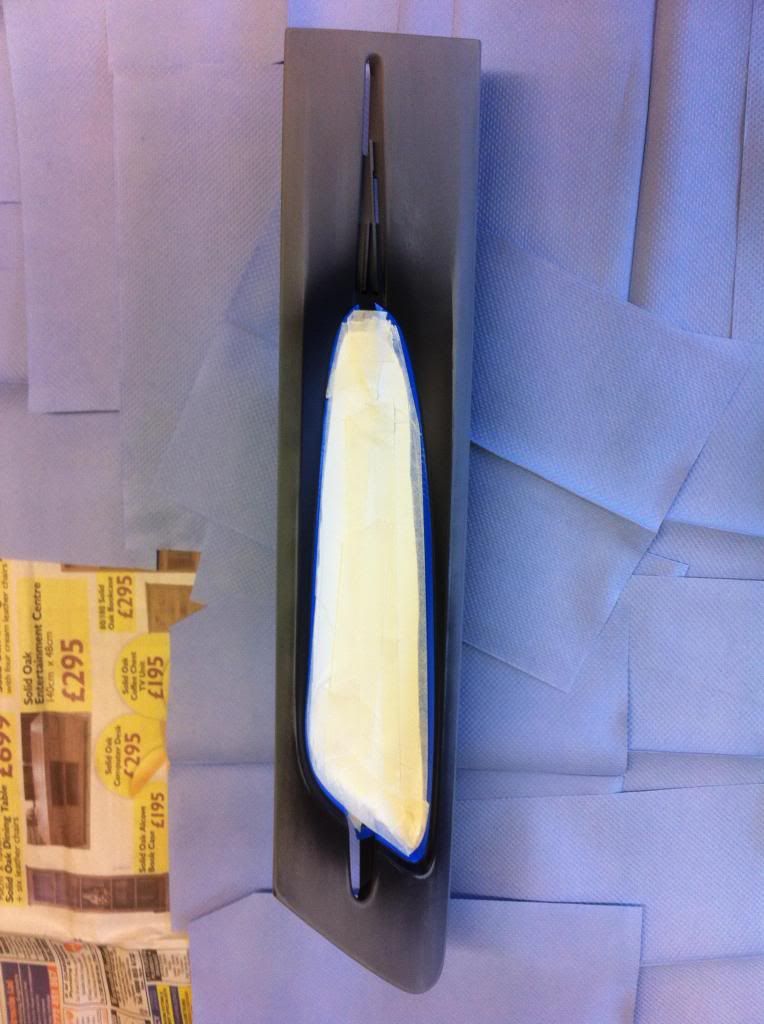
Here it is all ready to be sprayed I got the Titanium paint from Halfords, the nozzles the can comes with is pants truly awful!!!!
Anyway i sprayed them today, generally i'm pretty pleased. I rubbed them down with 1200 wet and dry between coats just to remove any imperfections from the previously mentioned pants nozzle.
So this is how they stand before the lacquer starts tomorrow.
Thanks!!
gookah wrote:('_')Z3 wrote:I hate masking, you spray it all think you've got a great finish only to remove all the masking to reveal a dusting of overspray or find its bled. And to cap it all patience is not something I've got in abundanceDaz3 wrote:There a real pain to mask up (well I thought they were) but just have patience and stay calm, good luck and they'll be worth it in the end.
just give them to me, I will save you all that frustration.
ps don't expect them back though......
Well i decided not to take Gookah up on his kind and generous offer
I've really tried to take my time with them to let the paint properly harden between coats
I started by spraying the matt black, like i said earlier i thought the mesh part was a seperate part but unfortunately not
Once the black was dry i masked with this 3M tape (again thanks Daz for the recommendation)
And then i filled in the missing bit with paper and then taped that down too.
Here it is all ready to be sprayed
Anyway i sprayed them today, generally i'm pretty pleased. I rubbed them down with 1200 wet and dry between coats just to remove any imperfections from the previously mentioned pants nozzle.
So this is how they stand before the lacquer starts tomorrow.


Re: The story so far 2.0ltr Titanium silver
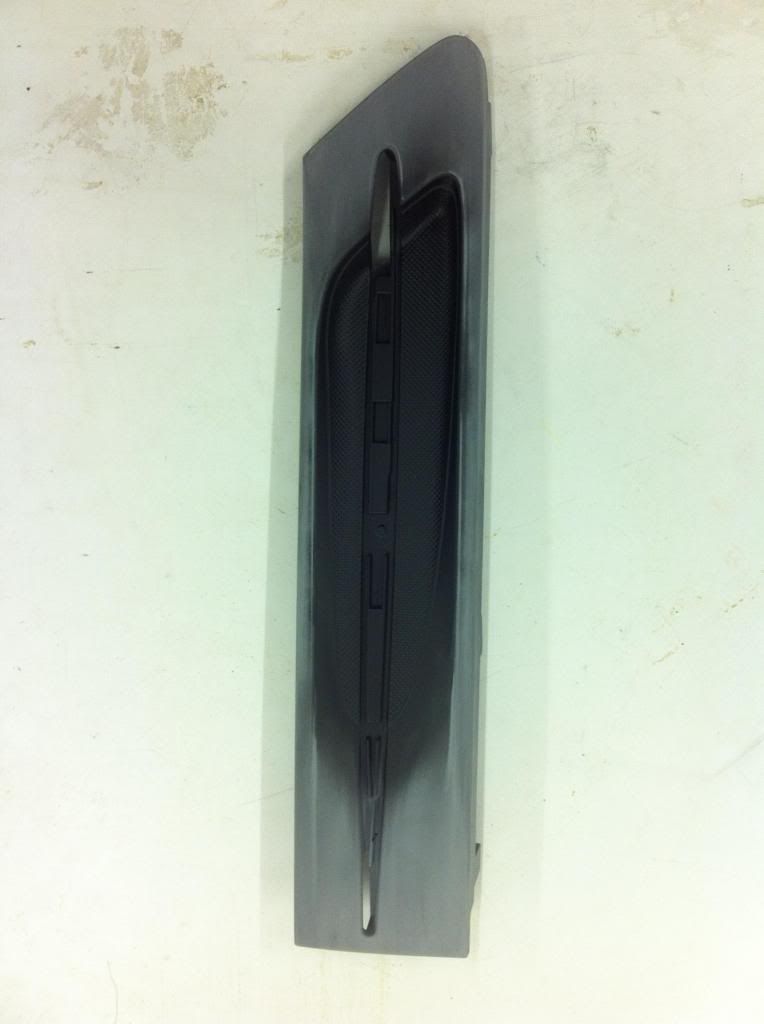
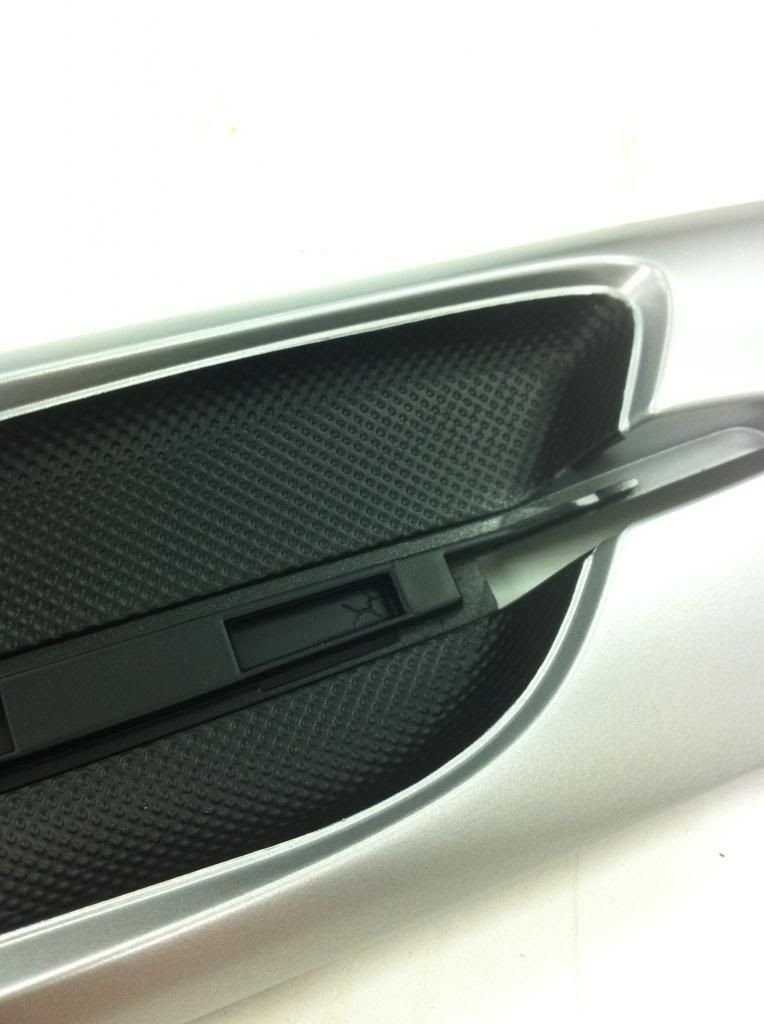
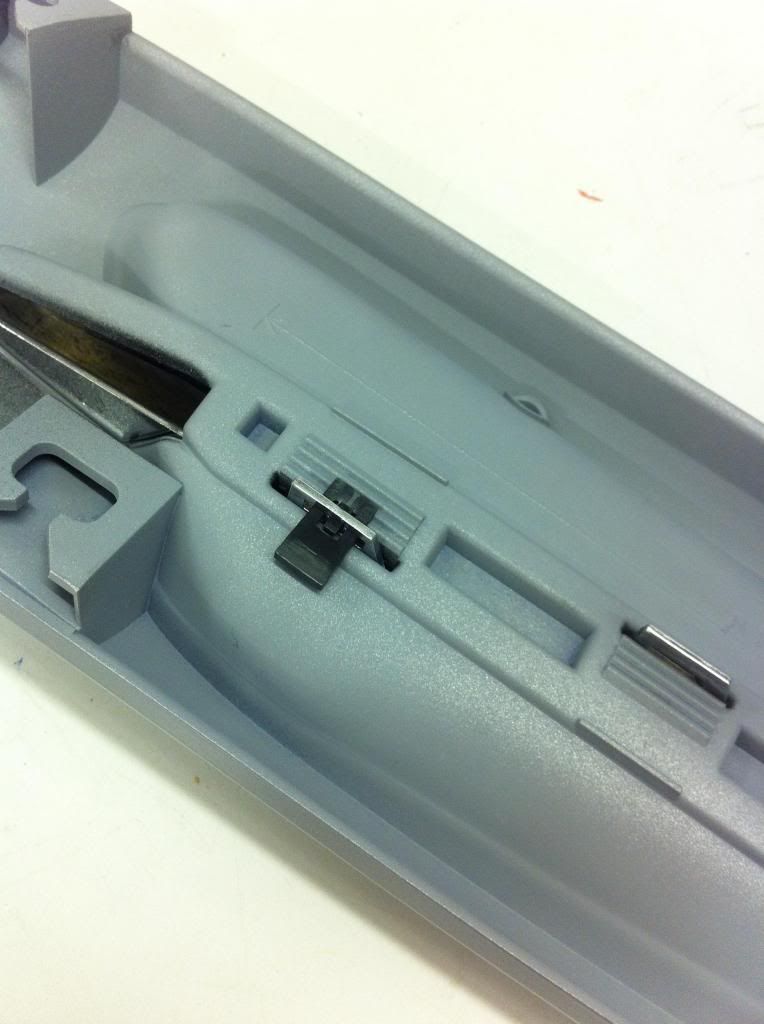
I've applied four coats of lacquer to the titanium. Before assembly
After assembly
And the back of the gills showing the clips that retain the chrome flash.
Two months to go and the car will be back on the road (just the small matter of the MOT when it's unsorned)
After assembly
And the back of the gills showing the clips that retain the chrome flash.
Two months to go and the car will be back on the road

Re: The story so far 2.0ltr Titanium silver
Looking good, can't wait to see them fitted and I bet you can't wait to get it back on the road 
2000 BMW Z3 2.8 Titanium Silver Roadster with too many mods to list 
Click For 2.0 Progress Journal
Click For 2.8 Progress Journal
Click For 2.0 Progress Journal
Click For 2.8 Progress Journal
Re: The story so far 2.0ltr Titanium silver
Cheers guys
A few jobs still to do:
Fit white third brake light
Fit tyres to AC Schnitzer wheels
Fit ///M Gills all over the next few weeks
But moving up the property ladder so car funds shortly will be kind of limited as they'll be going to the builder 
A few jobs still to do:
Fit white third brake light
Fit tyres to AC Schnitzer wheels
Fit ///M Gills all over the next few weeks
But moving up the property ladder so car funds shortly will be kind of limited
Last edited by ('_')Z3 on Wed 13 Feb, 2013 21:28, edited 1 time in total.
Re: The story so far 2.0ltr Titanium silver
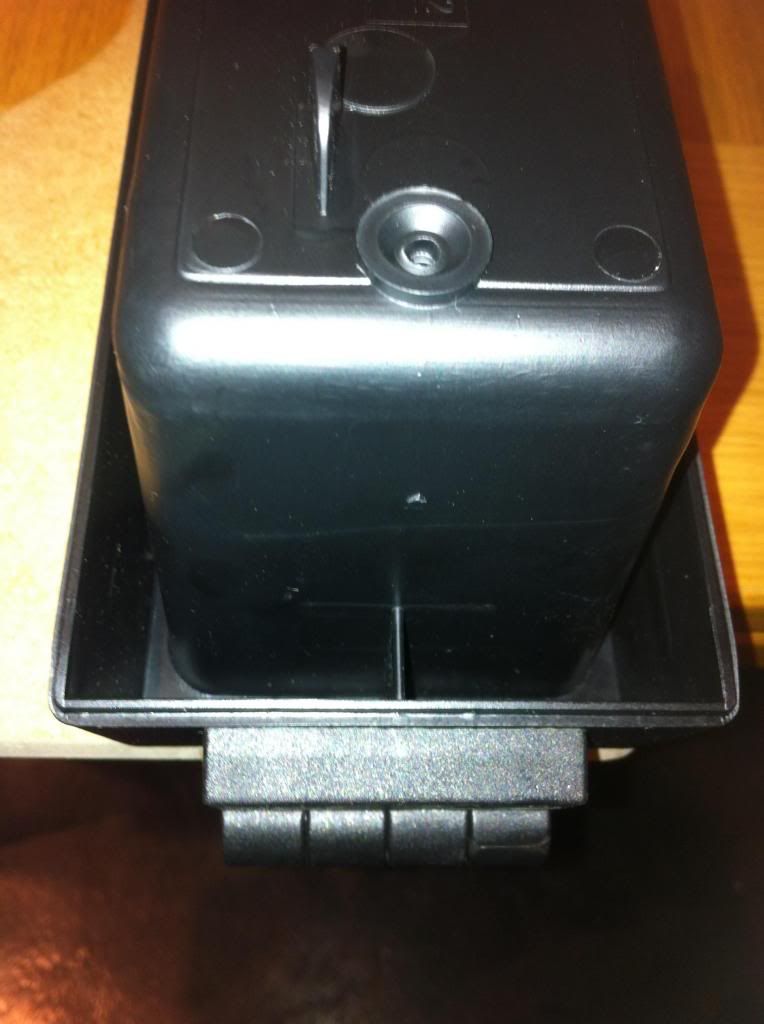
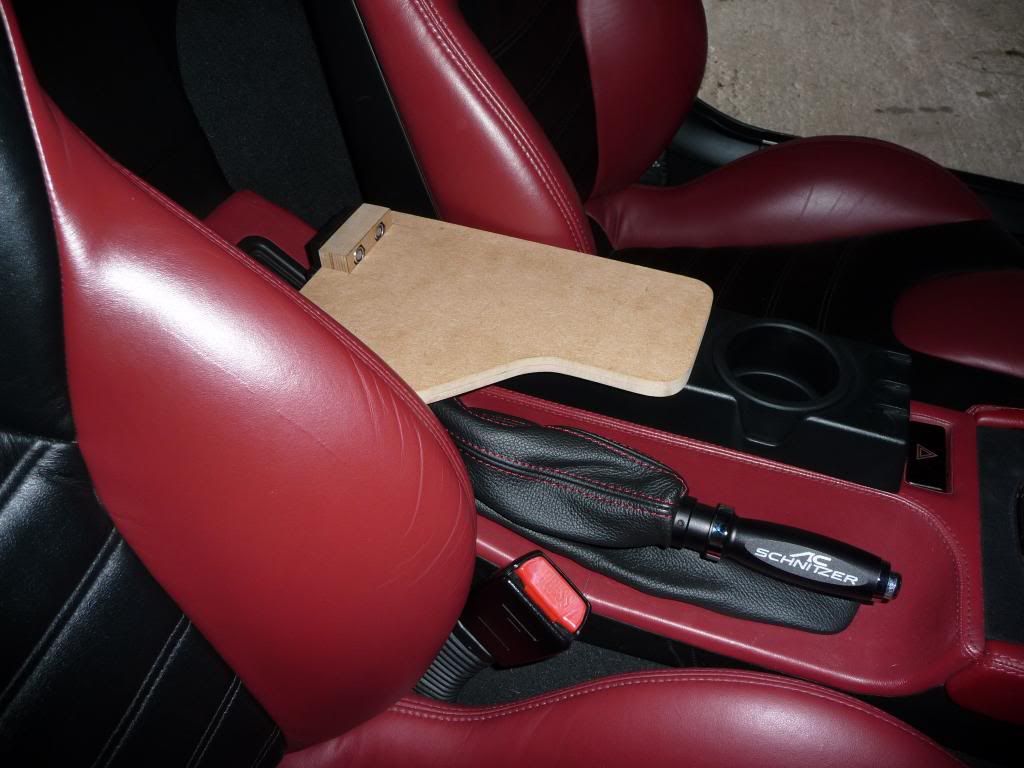
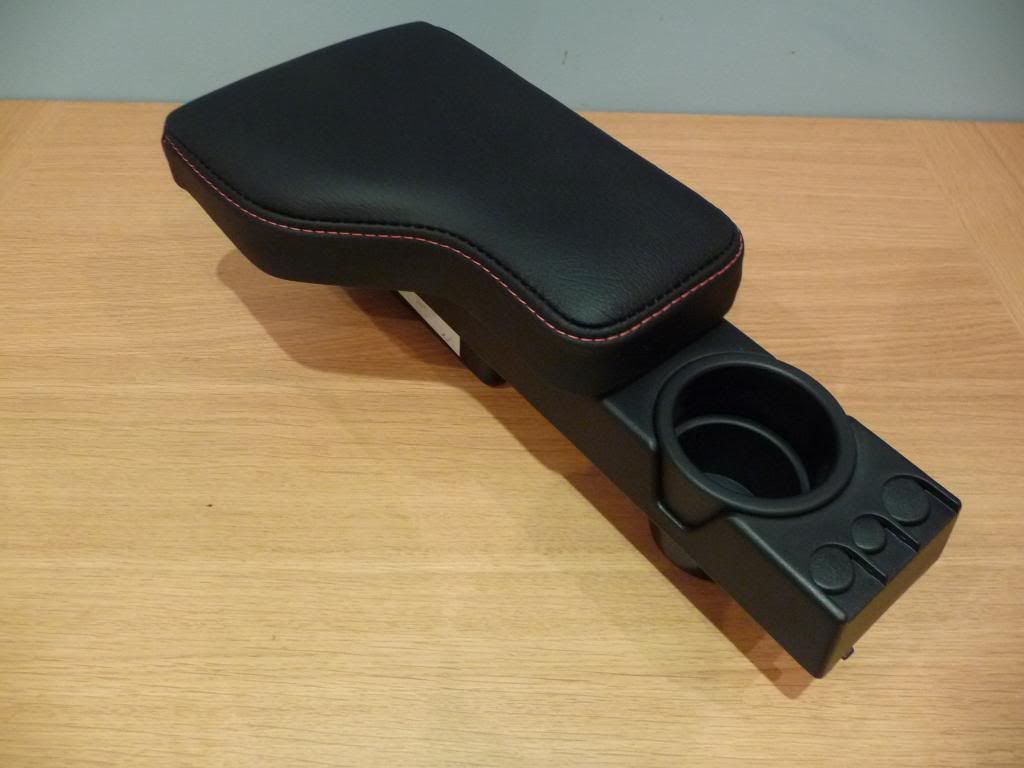
Having bought my cup holder a couple of months ago i've been giving it a bit of thought as to how i would go about fitting the upholstered part
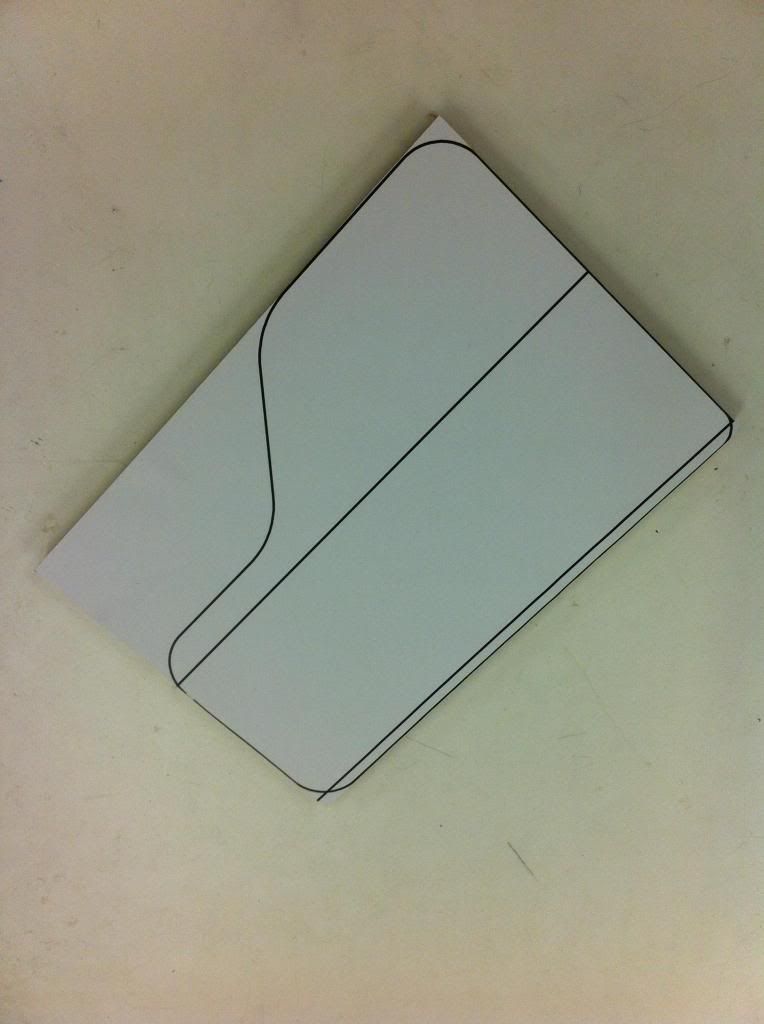
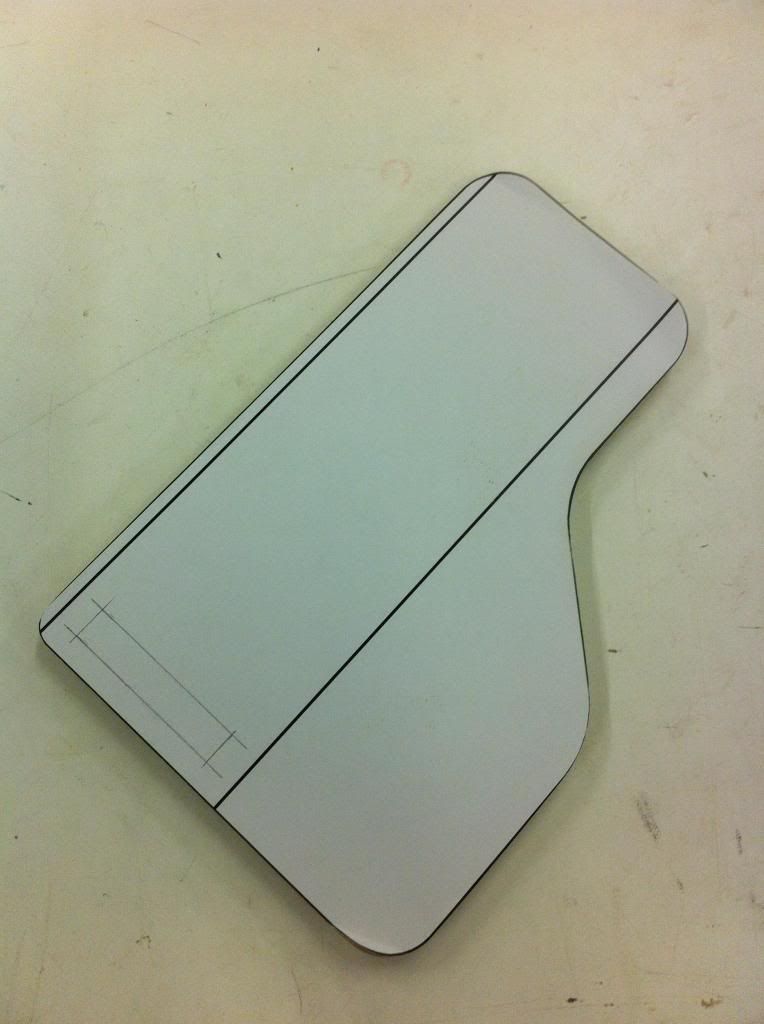
I considered plywood for the lifting part but eventually plumped for good old MDF due to it remaining more stable in varying temps etc. I drew out my template before sticking it onto the MDF and using the band saw to cut it out.
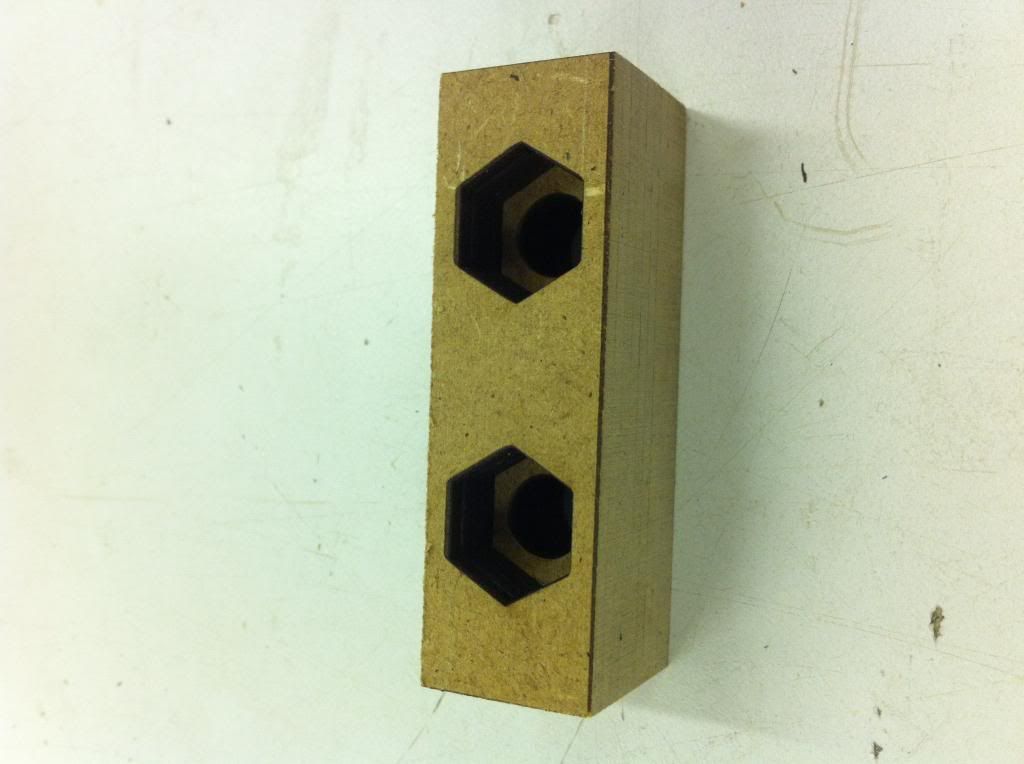
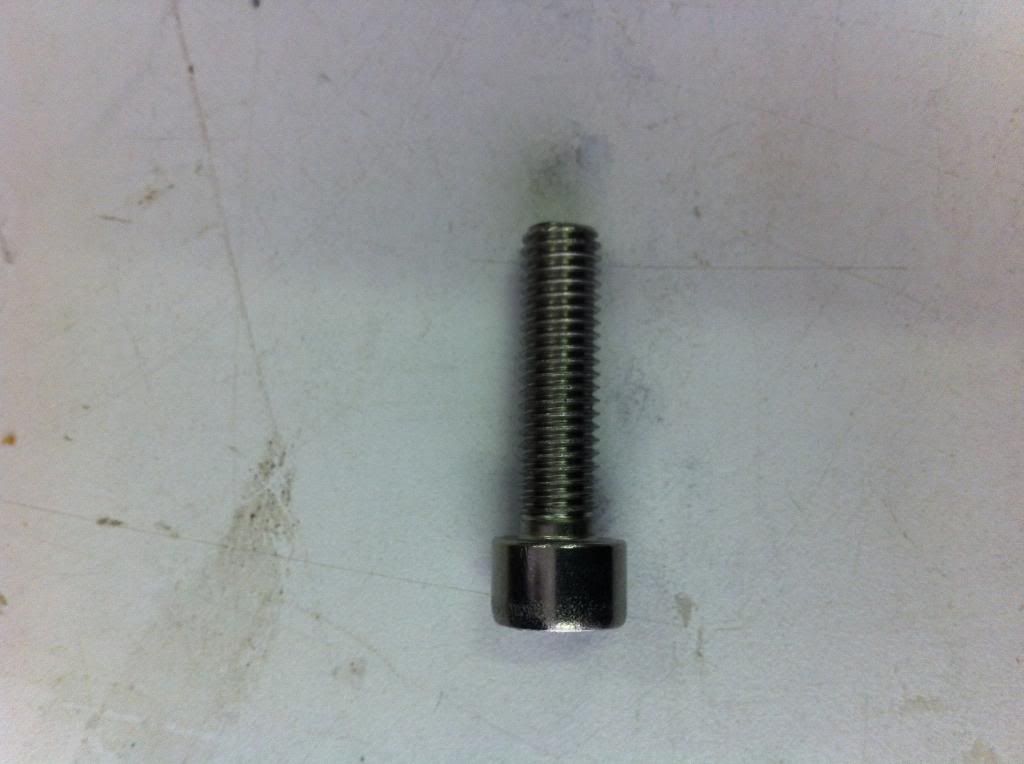
I knew i wanted a black plastic/nylon hinge to match/blend with the OEM plastic as much as possible but really struggled to find one at the usual outlets (B&Q etc). Eventually i found one on Ebay £2.10 delivered from Hong Kong My idea is to bolt the hinge to the two parts using some stainless steel M8 allen key head bolts, nuts and washers also from Ebay.

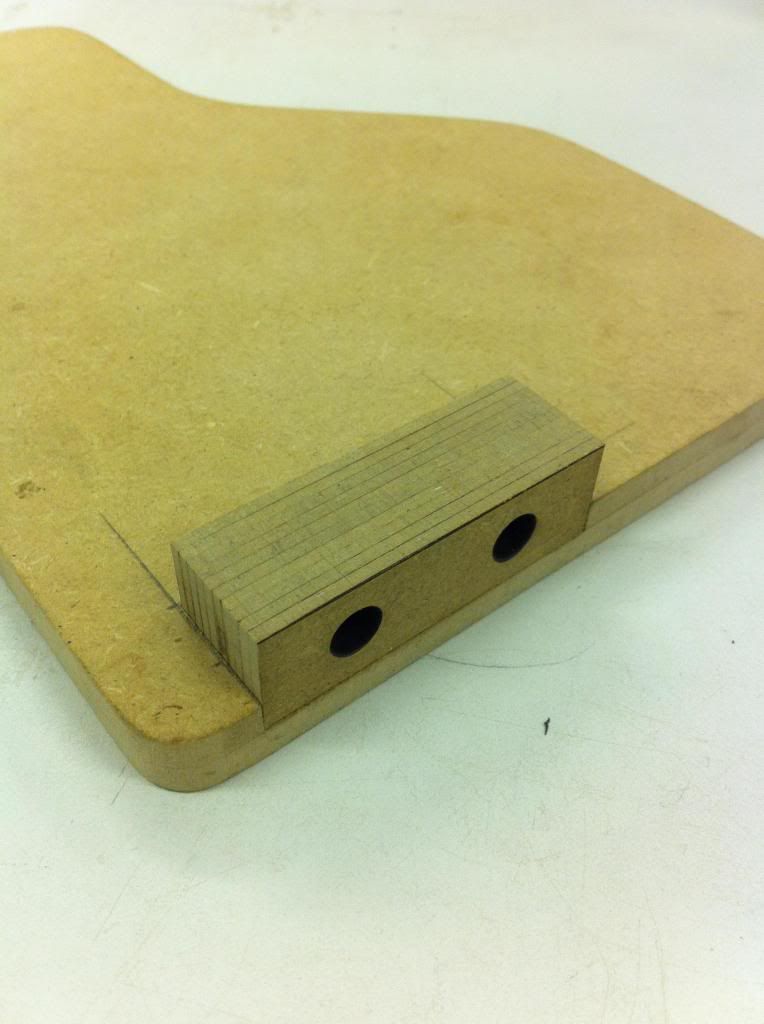
Again the laser cutter came in handy as i drew the pieces i required and cut them out before gluing them together
A simple rebate cut out from the armrest part and it fitted perfectly
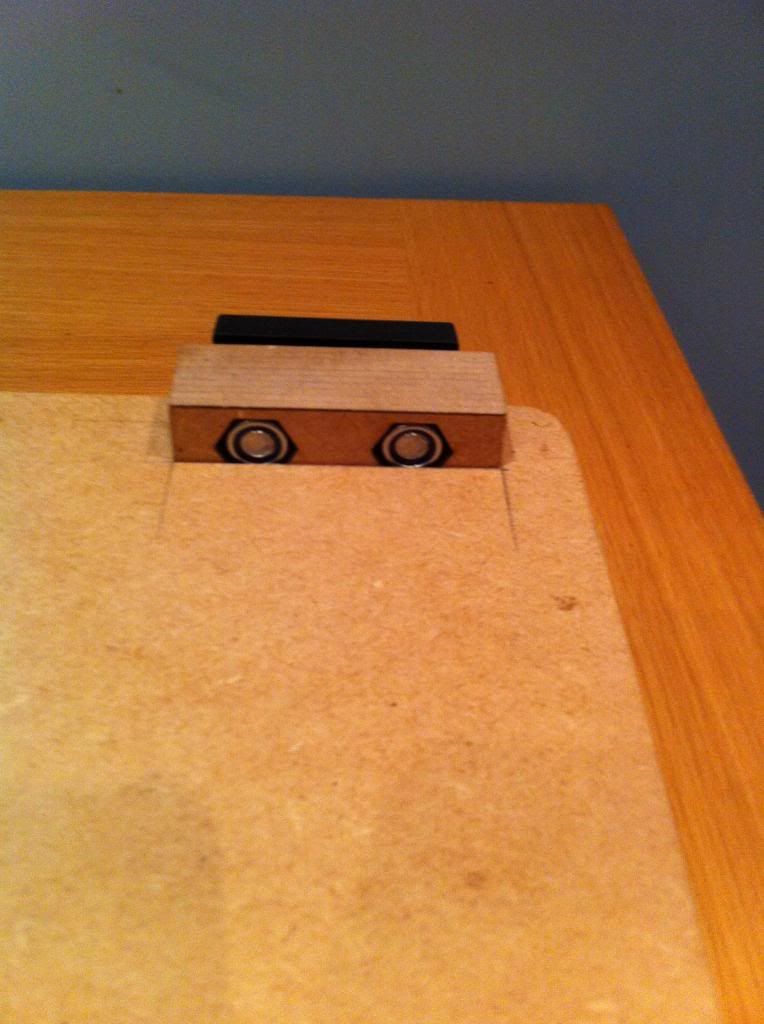
The nyloc nuts fitted perfectly in the hexagonal holes and are held in place by the edge of the rebate and with a little bit of tweaking the hinge fitted the bolts perfectly. Although the bolts are silver currently i'll be spraying them black for the finished effect.
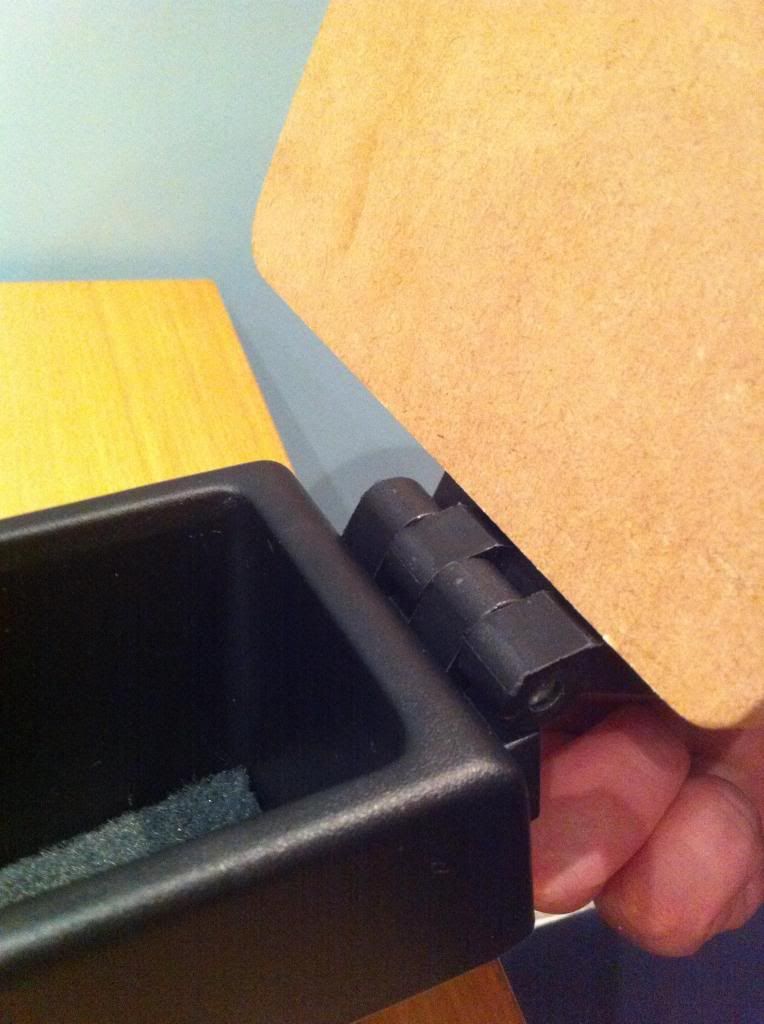
The bottom part of the hinge will be bolted to the cup holder, but i won't be drilling those holes until i get the armrest back from the upholsterers just in case the lining on the bottom affects anything. I'm planning on strenthening the outer plastic wall and having the nuts hidden between the two for a cleaner look
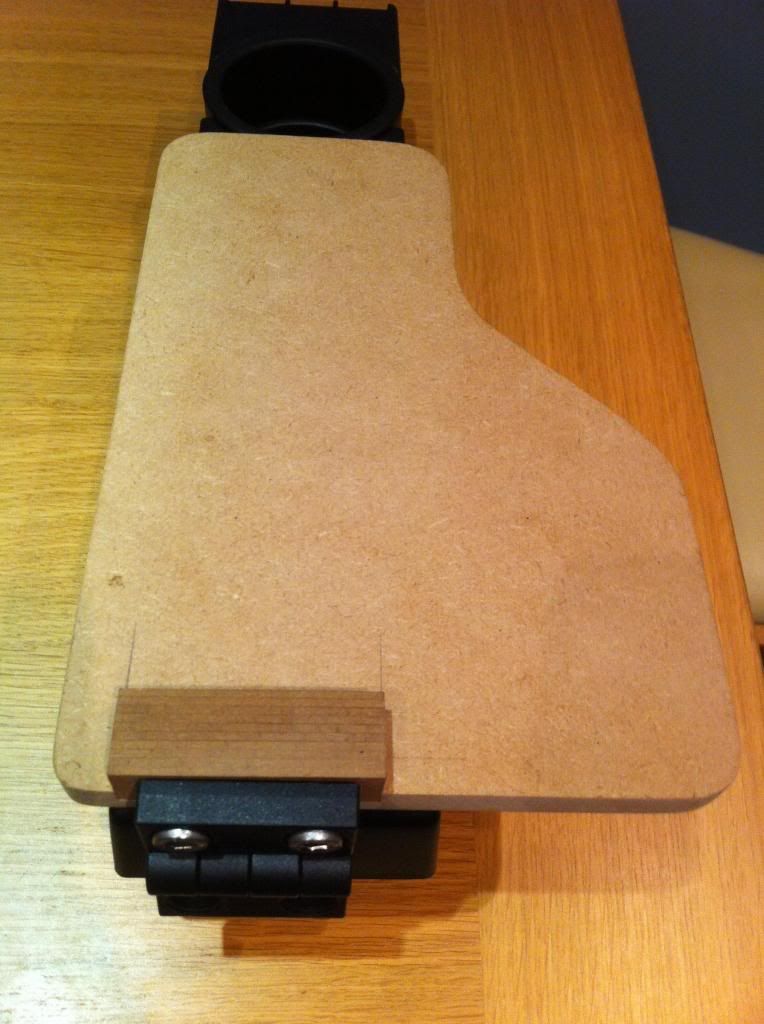
I need to decide whether to go black or red with the leather before i take it around to the guy that did my console.
I considered plywood for the lifting part but eventually plumped for good old MDF due to it remaining more stable in varying temps etc. I drew out my template before sticking it onto the MDF and using the band saw to cut it out.
I knew i wanted a black plastic/nylon hinge to match/blend with the OEM plastic as much as possible but really struggled to find one at the usual outlets (B&Q etc). Eventually i found one on Ebay £2.10 delivered from Hong Kong
Again the laser cutter came in handy as i drew the pieces i required and cut them out before gluing them together
A simple rebate cut out from the armrest part and it fitted perfectly
The nyloc nuts fitted perfectly in the hexagonal holes and are held in place by the edge of the rebate and with a little bit of tweaking the hinge fitted the bolts perfectly. Although the bolts are silver currently i'll be spraying them black for the finished effect.
The bottom part of the hinge will be bolted to the cup holder, but i won't be drilling those holes until i get the armrest back from the upholsterers just in case the lining on the bottom affects anything. I'm planning on strenthening the outer plastic wall and having the nuts hidden between the two for a cleaner look
I need to decide whether to go black or red with the leather before i take it around to the guy that did my console.
Re: The story so far 2.0ltr Titanium silver
Looking good! Very neat and tidy and looks even better than an OEM job!
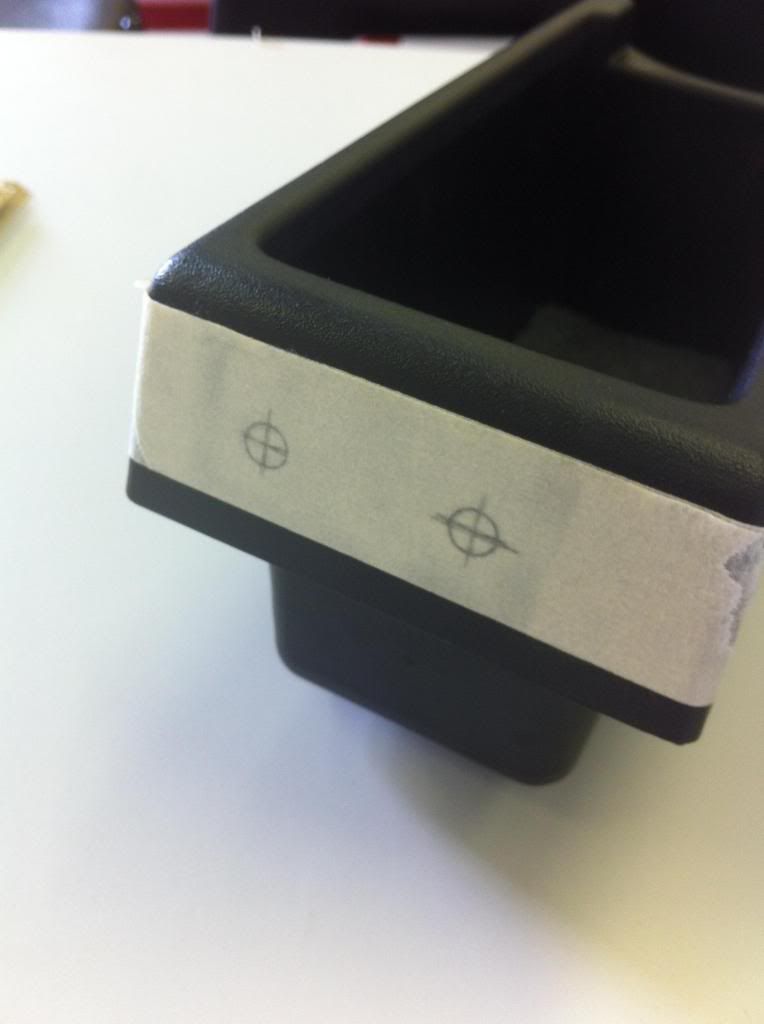
On the last pic there is a little tab that sticks down that must go through a hole in the console, but as there is no hole in a zed console it doesn't fully push down and needs trimming off. Or at least that's what I found on mine so keep this in mind
On the last pic there is a little tab that sticks down that must go through a hole in the console, but as there is no hole in a zed console it doesn't fully push down and needs trimming off. Or at least that's what I found on mine so keep this in mind
2000 BMW Z3 2.8 Titanium Silver Roadster with too many mods to list
Click For 2.0 Progress Journal
Click For 2.8 Progress Journal
Click For 2.0 Progress Journal
Click For 2.8 Progress Journal

Re: The story so far 2.0ltr Titanium silver
^^ Great work 
-
Badman gee

- Joined: Sun 14 Nov, 2010 10:45
- Posts: 2299


Re: The story so far 2.0ltr Titanium silver
I got the chance to do a few jobs on the Z today that were nothing major just small things that needed doing but i'd put off.
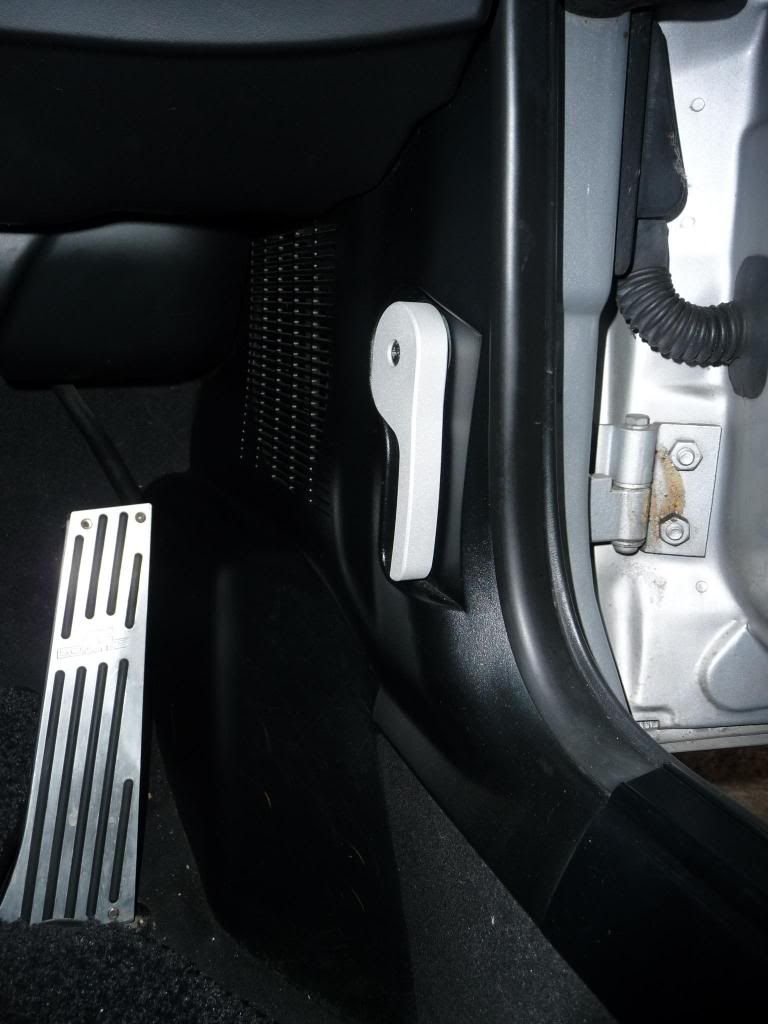
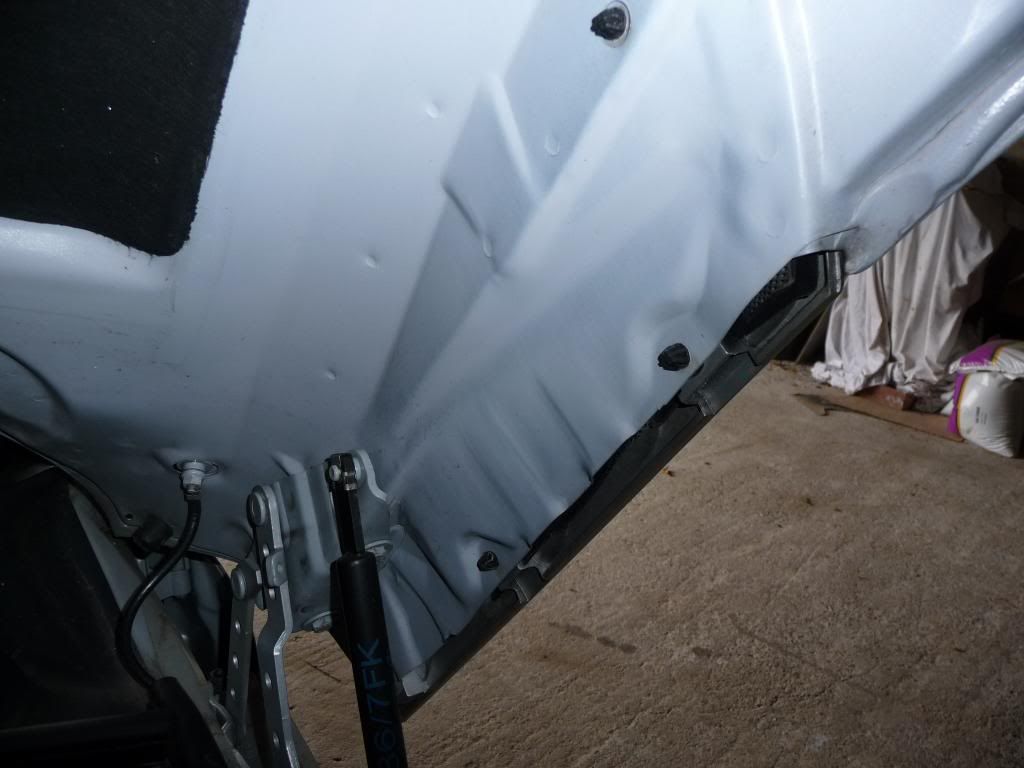
Firstly Dougw bonnet release, i didn't buy one last time but pm'd him about a year ago seeing if he had any? anyway the message sat in my outbox for all that time until he replied last week  It arrived this morning which was handy
Before
After
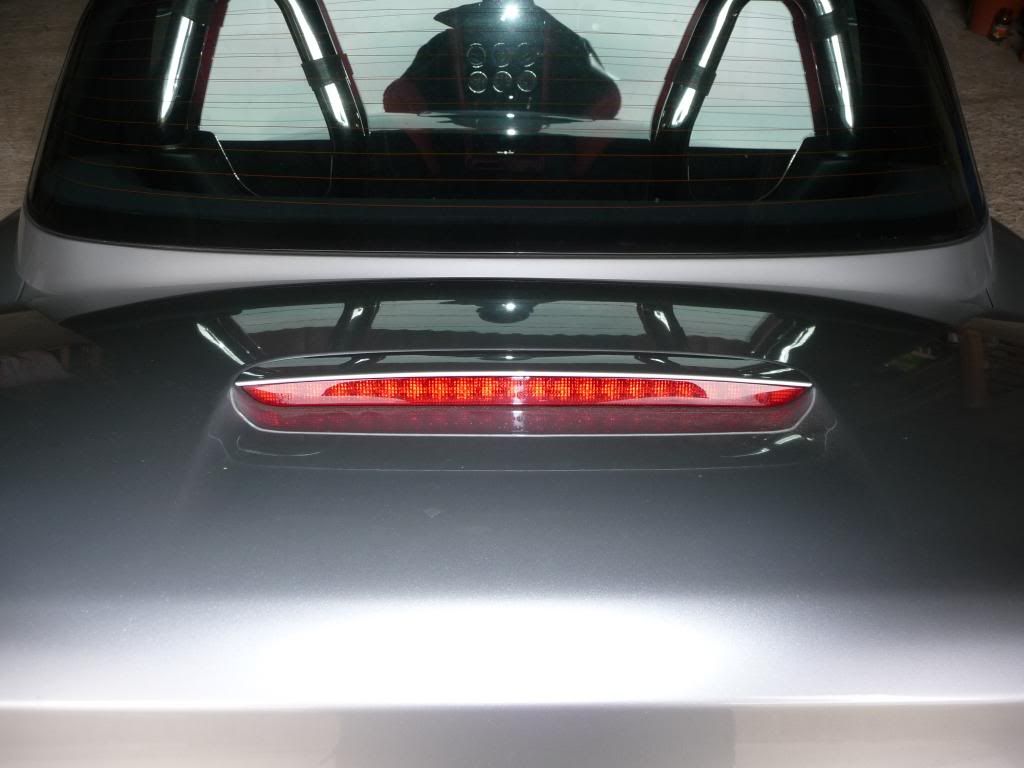
The white third brake light i purchased a while ago and hadn't quite got round to fitting Essentially it's pretty easy to do (actually v.easy) the proof of how successful it was will be when it rains i guess so fingers crossed there is no leak.
This is the boot light as was!
The boot lid has 4 black caps that once removed exposed the 3 nuts that hold the light in place and the small plug to disconnect the light. I think it was an 8mm socket but can't quite remember
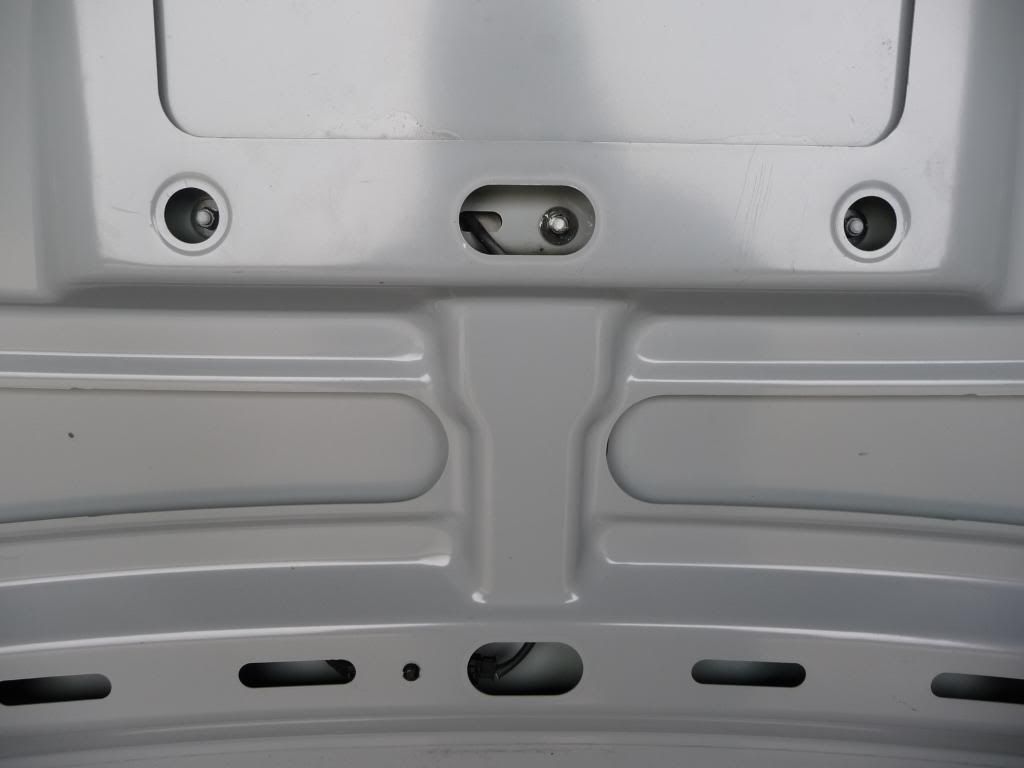
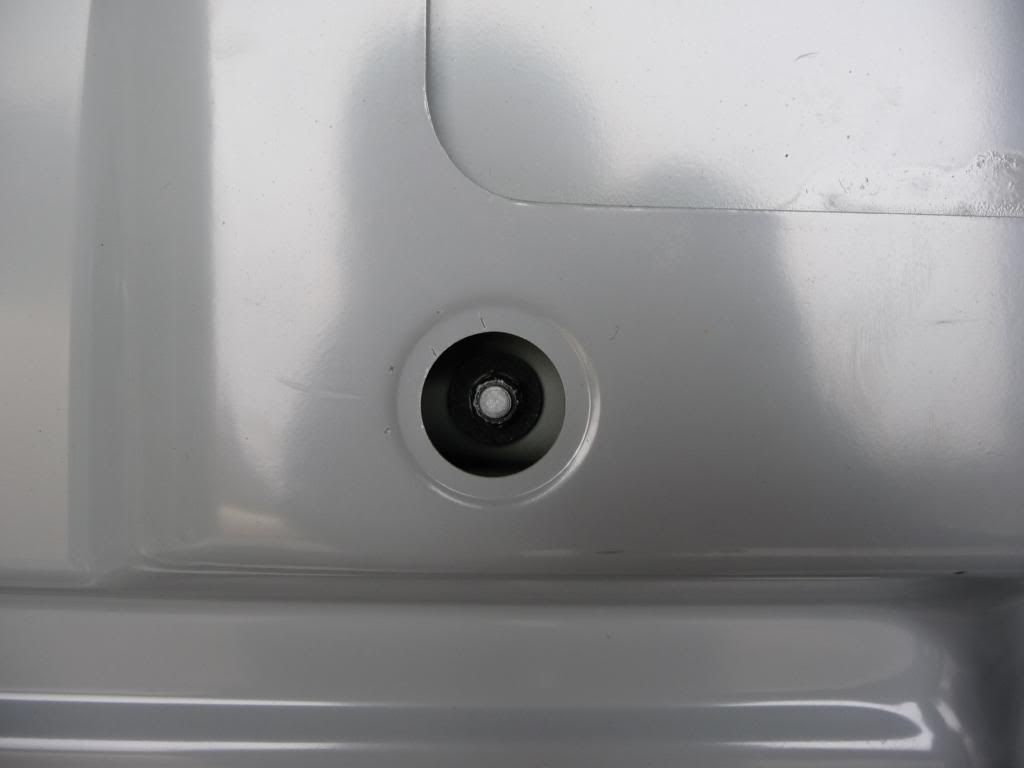
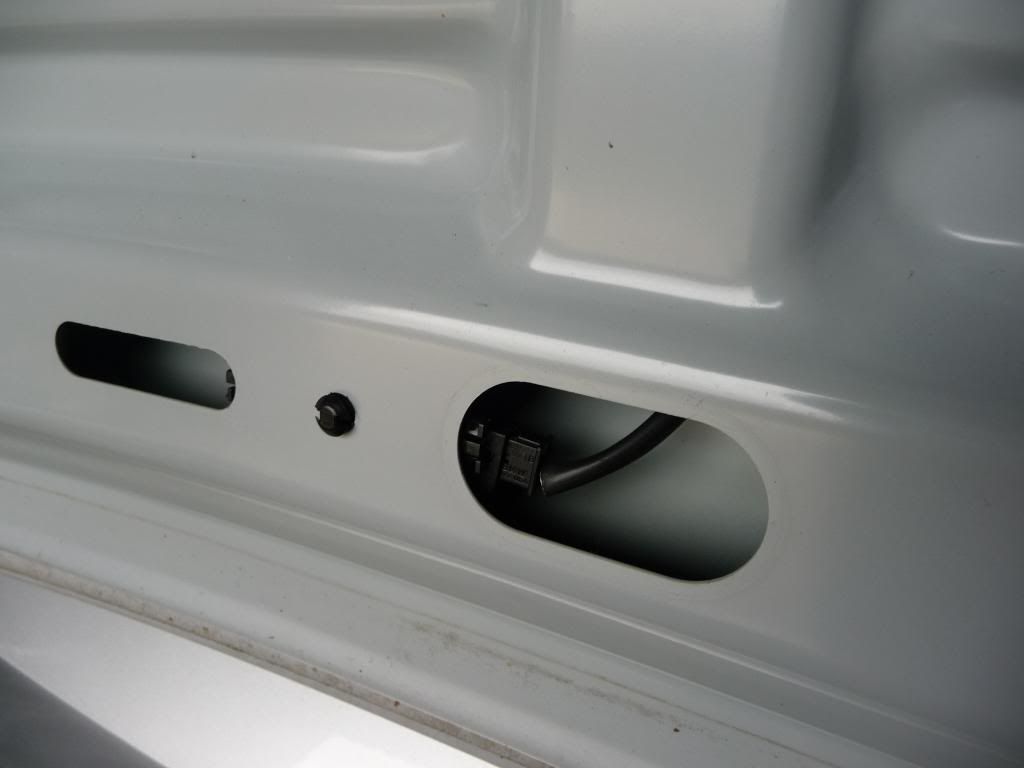
Once i'd removed the nuts the light comes out with the part that covers it, surprisingly this is metal and quite heavy. The light is attached to the metal cover by 3 small torx head screws. I used the cloth just to make sure it didn't mark the paint before unplugging the light. It was pretty dirty under there
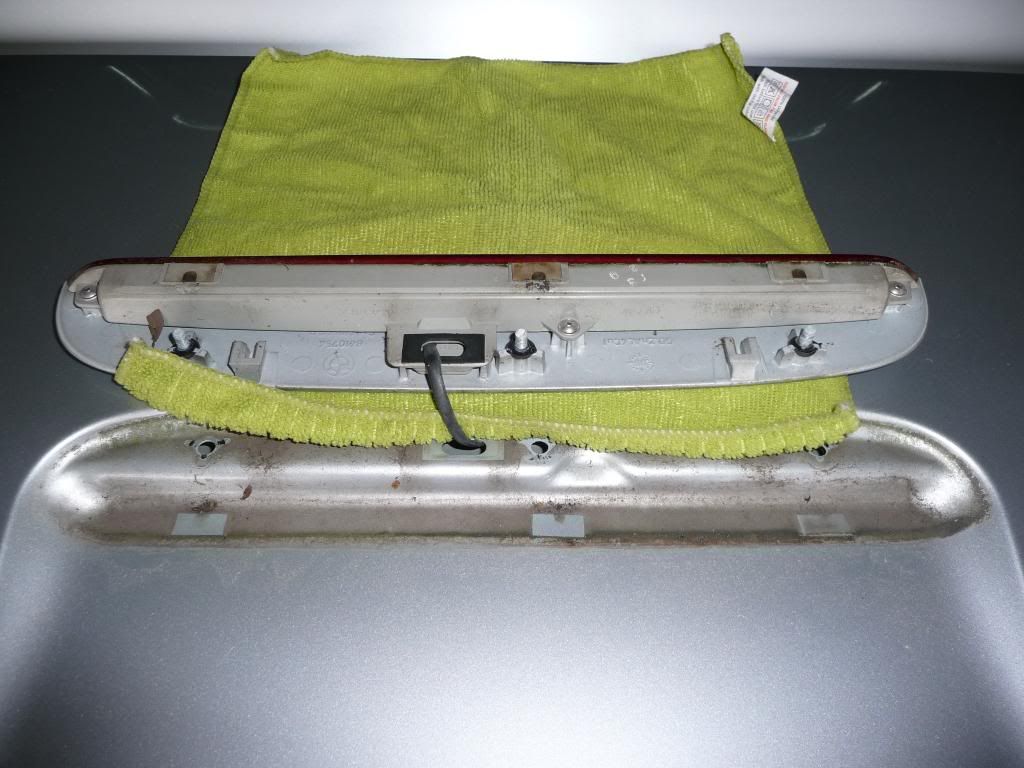
So a bit of a clean was needed
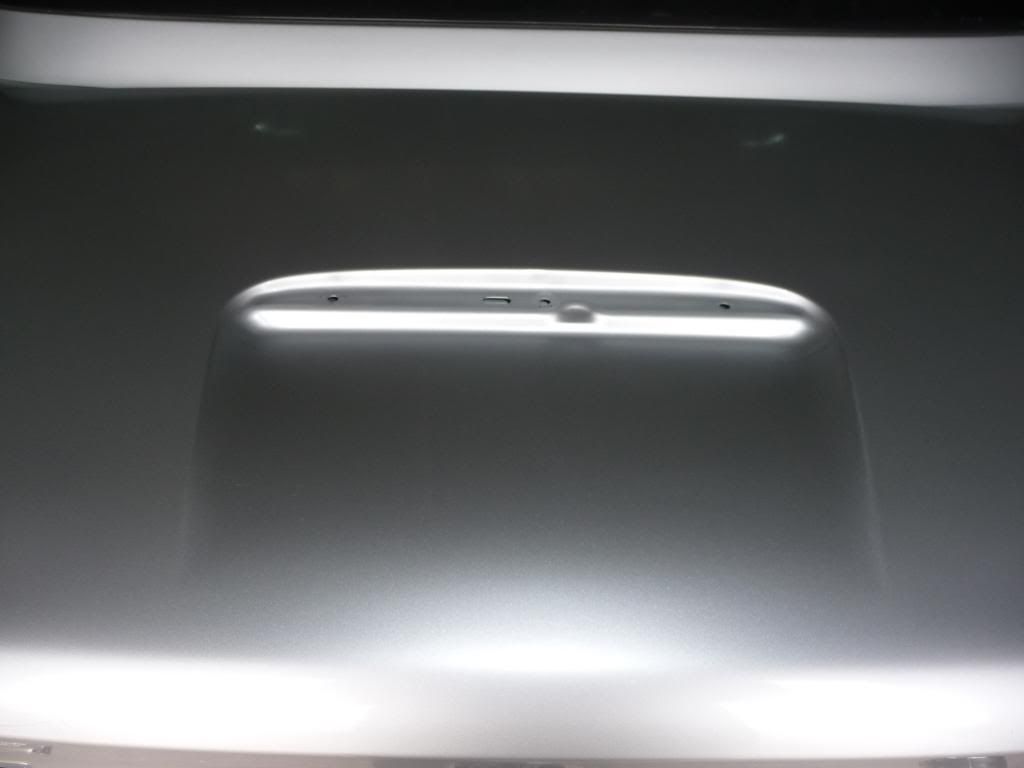
Fiiting was as you would expect the reverse
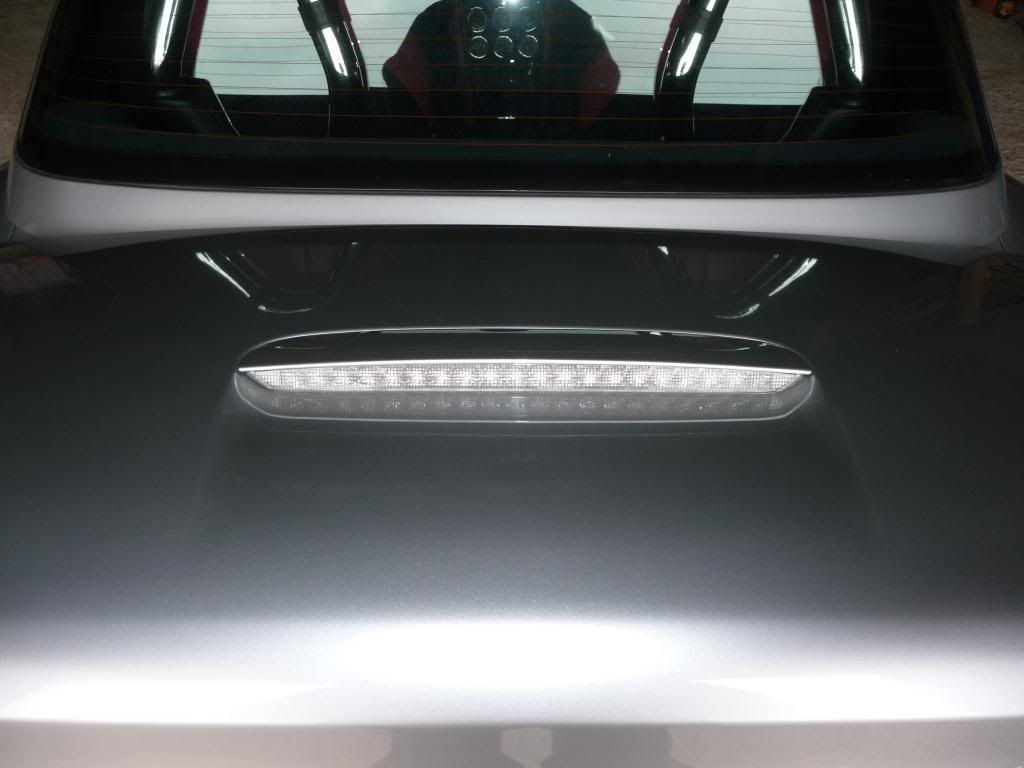
I'm much happier with the finished look.
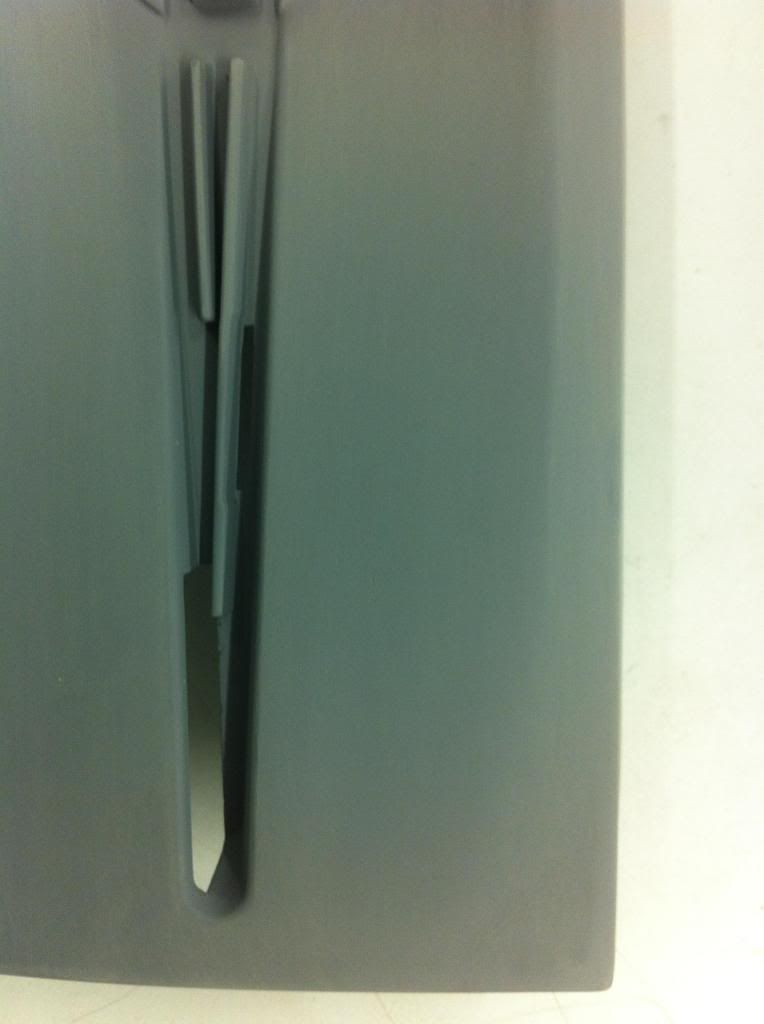
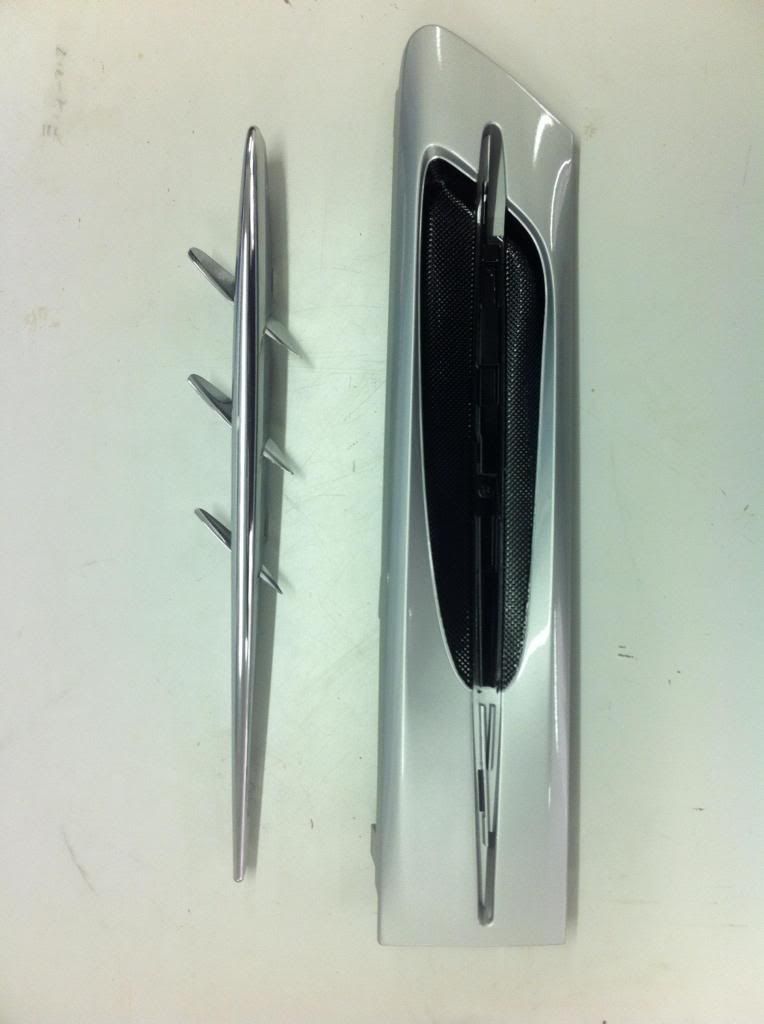
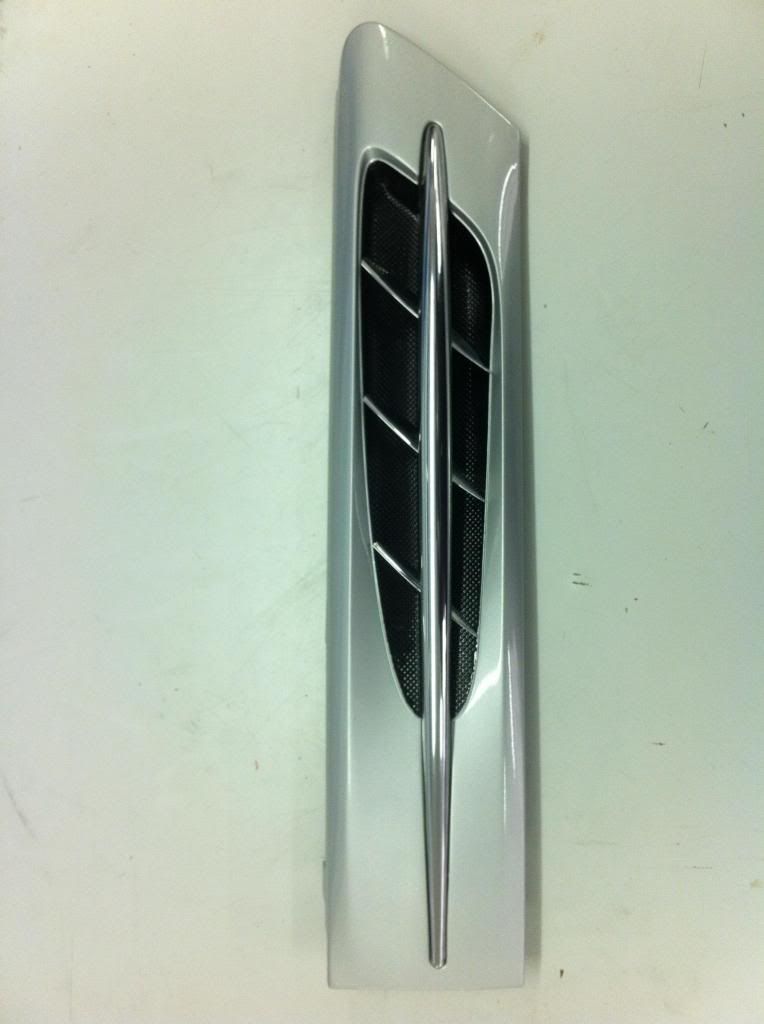
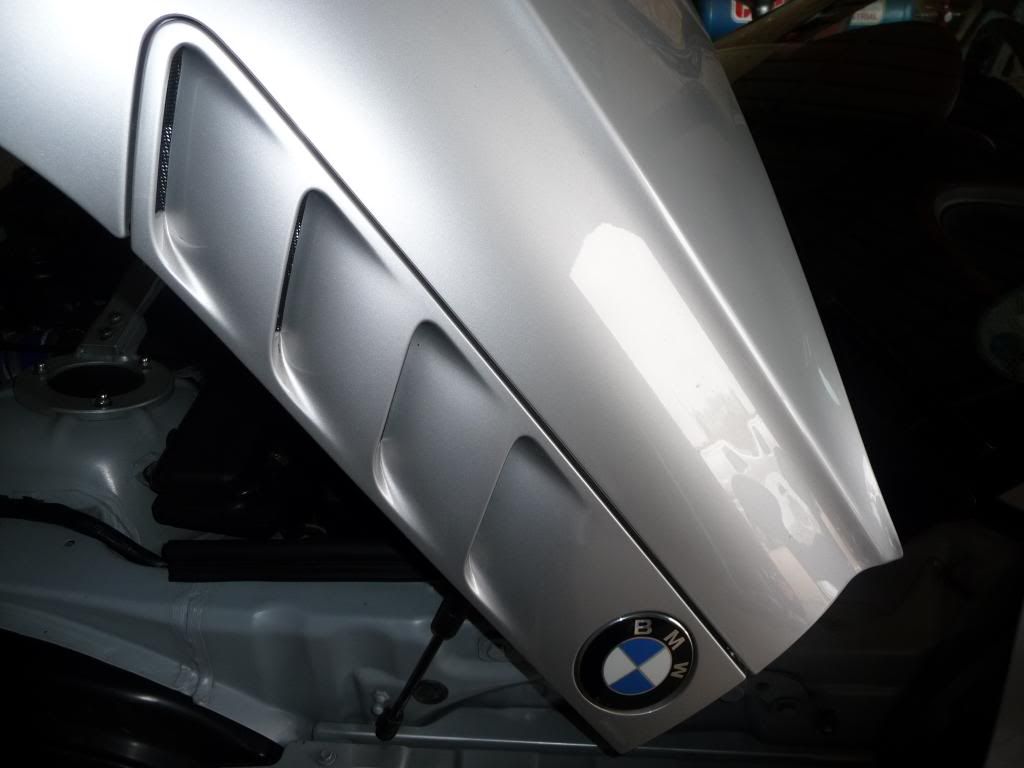
The side ///M vents had been painted for a few weeks giving them the opportunity to properly harden. The old ones were a bit awkward to remove, a screw and the 5 plugs. With a bit of effort and brute force they came off
The plugs i mentioned
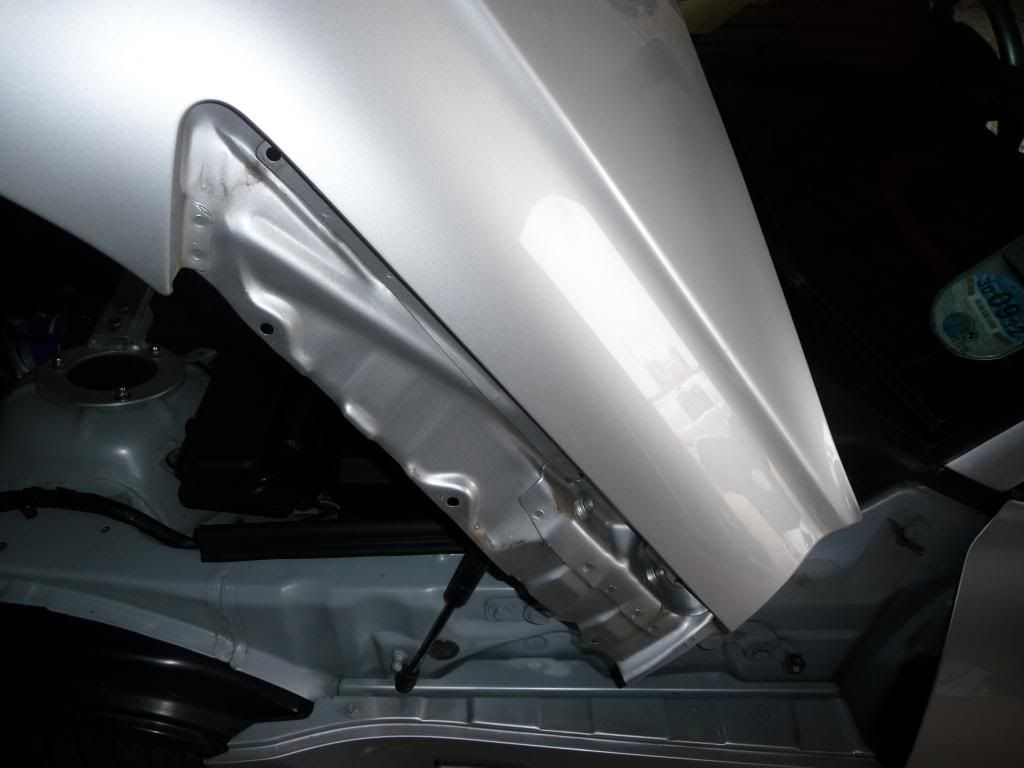
And the view of the bonnet wwith the gill removed.
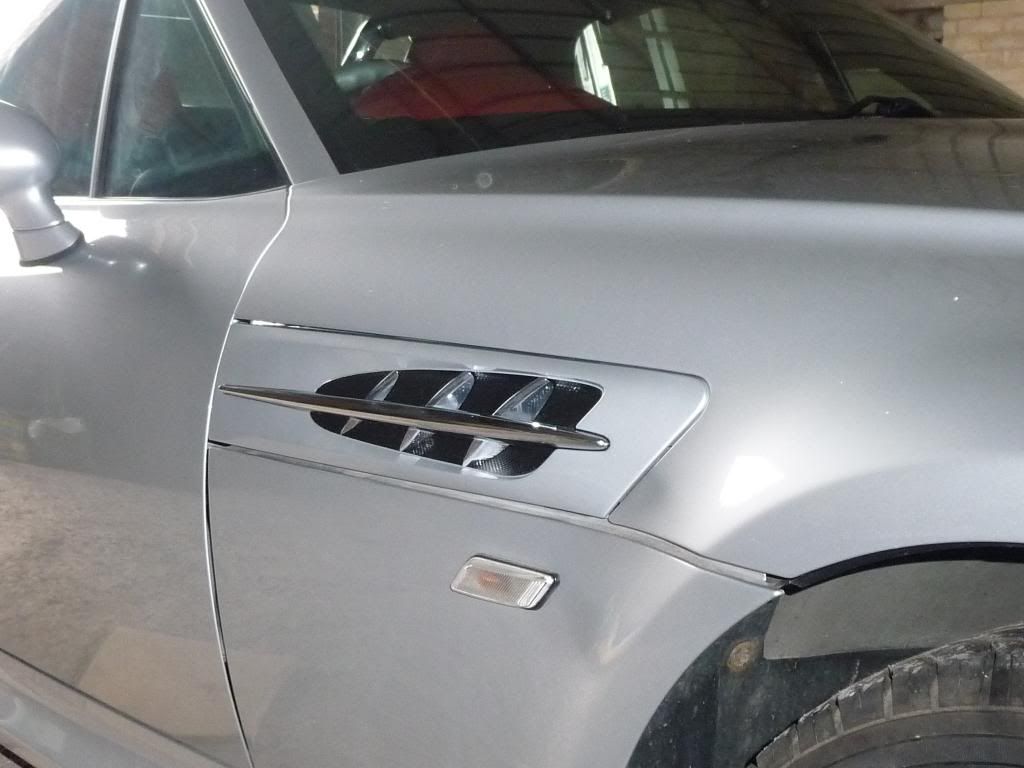
And finally the ///M gill fitted
My aerial grommet like many others was in a bad way
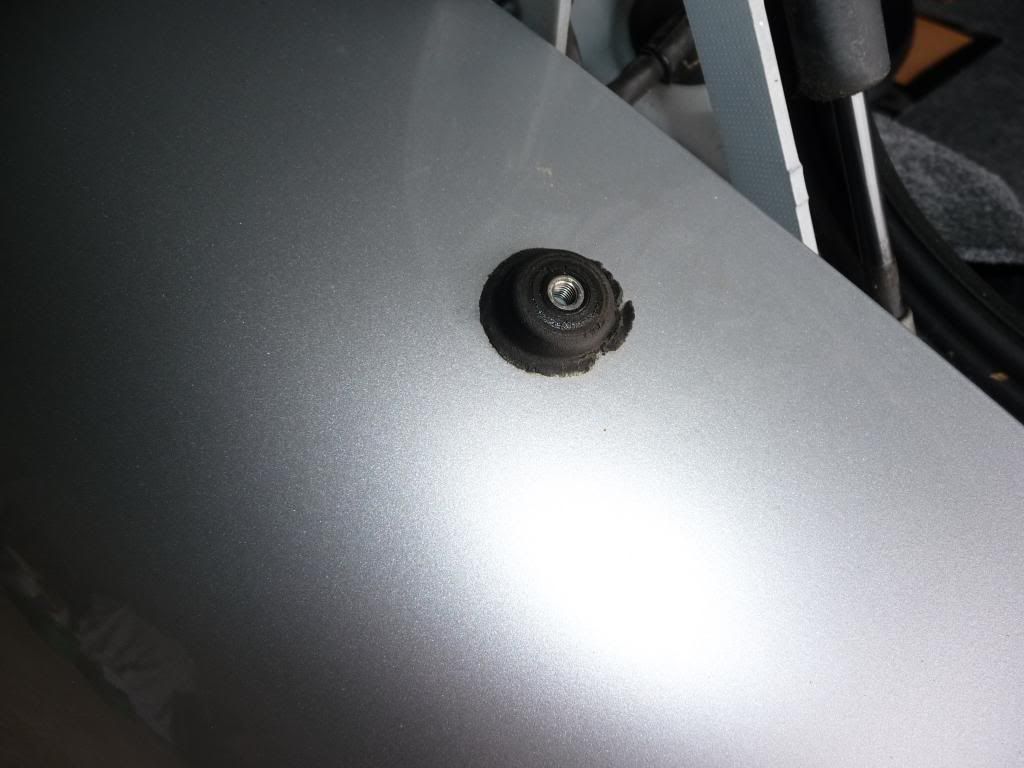
The part from the dealers was only a few pounds but for some reason i'd put this job off. It was a pain, once you remove the carpet trim from the boot to expose the aerial that handily sits behind the hydraulic roof pump I removed the 7mm screw which secures it but couldn't waggle it free to remove the old grommet The pump is relatively simply held so out that came to gain a bit more access so i could actuallt get it out.
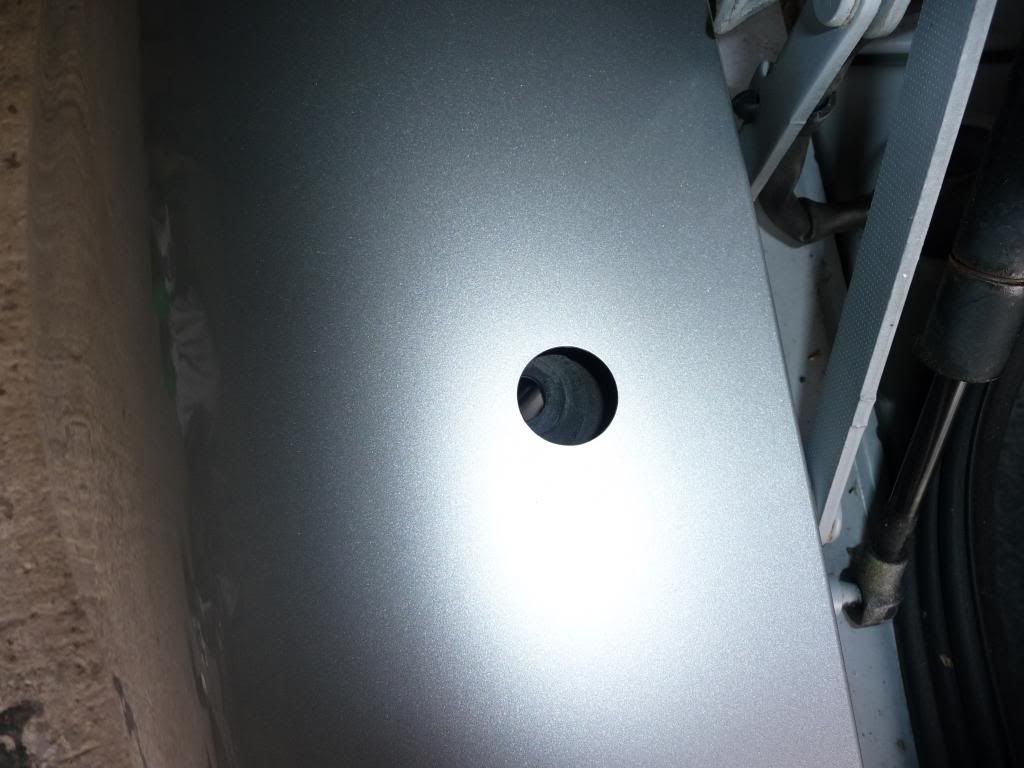
Actually putting it back together was just as fiddly (not the job for adult fingers)
Unfortunately i forgot to take a final picture of the new one fitted but i'm sure you know what one looks like
All that left was the armrest, i just wanted to check that i was happy with everything size wise before i went to the cost of getting it covered.

Thankfully all was fine.
Firstly Dougw bonnet release, i didn't buy one last time but pm'd him about a year ago
Before
After
The white third brake light i purchased a while ago and hadn't quite got round to fitting
This is the boot light as was!
The boot lid has 4 black caps that once removed exposed the 3 nuts that hold the light in place and the small plug to disconnect the light. I think it was an 8mm socket but can't quite remember
Once i'd removed the nuts the light comes out with the part that covers it, surprisingly this is metal
So a bit of a clean was needed
Fiiting was as you would expect the reverse
I'm much happier with the finished look.
The side ///M vents had been painted for a few weeks giving them the opportunity to properly harden. The old ones were a bit awkward to remove, a screw and the 5 plugs. With a bit of effort and brute force they came off
The plugs i mentioned
And the view of the bonnet wwith the gill removed.
And finally the ///M gill fitted
My aerial grommet like many others was in a bad way
The part from the dealers was only a few pounds but for some reason i'd put this job off. It was a pain, once you remove the carpet trim from the boot to expose the aerial that handily sits behind the hydraulic roof pump
Actually putting it back together was just as fiddly (not the job for adult fingers)
Unfortunately i forgot to take a final picture of the new one fitted but i'm sure you know what one looks like
All that left was the armrest, i just wanted to check that i was happy with everything size wise before i went to the cost of getting it covered.
Thankfully all was fine.
Re: The story so far 2.0ltr Titanium silver
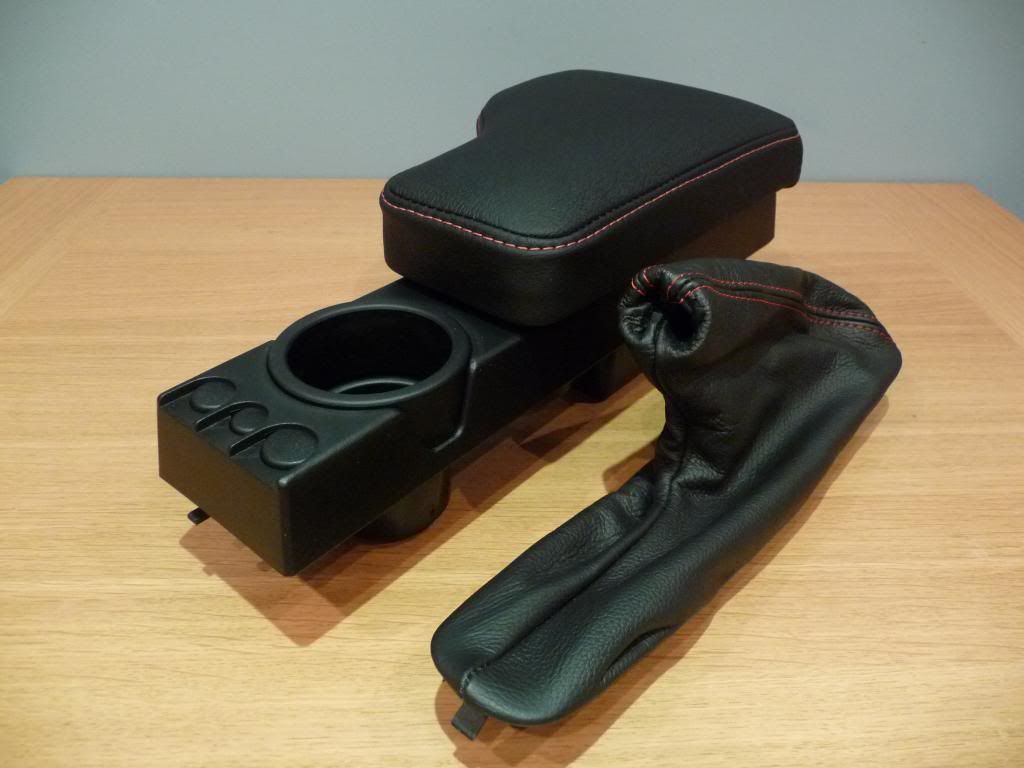
I handed over my MDF armrest too the upholstery guy a couple of weeks ago and told him there was no rush longest two weeks of my life In readiness for its returrn i'd started on the M8 allen key bolts. Two were the perfect length and two were too long So i set about shortening them
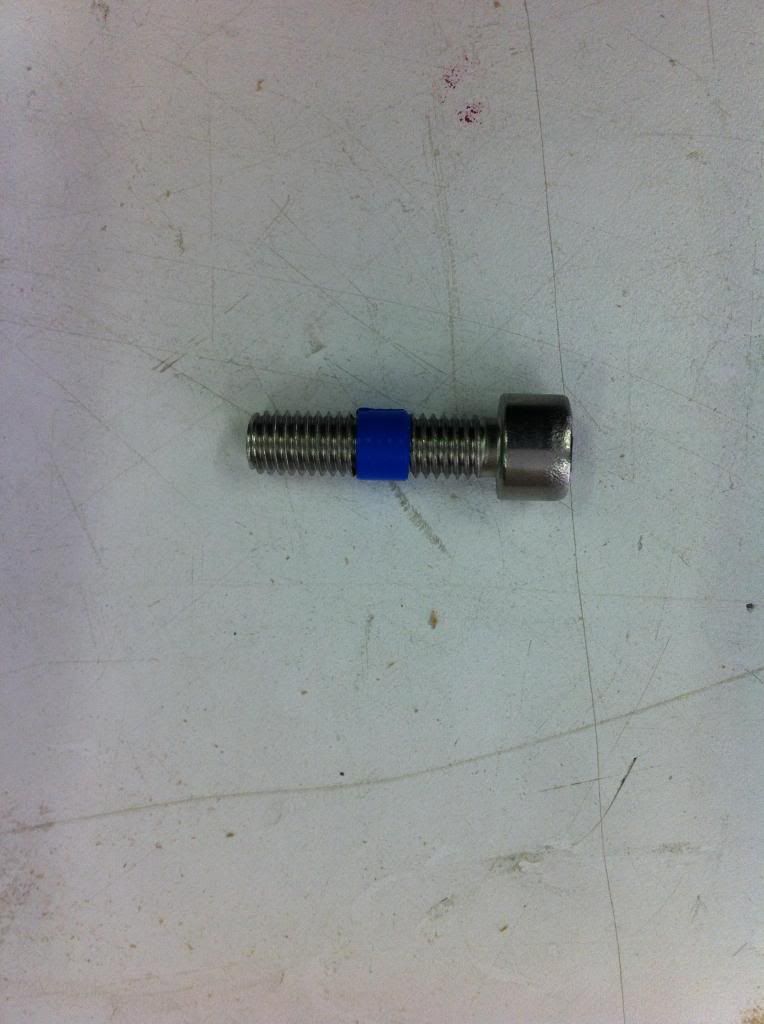
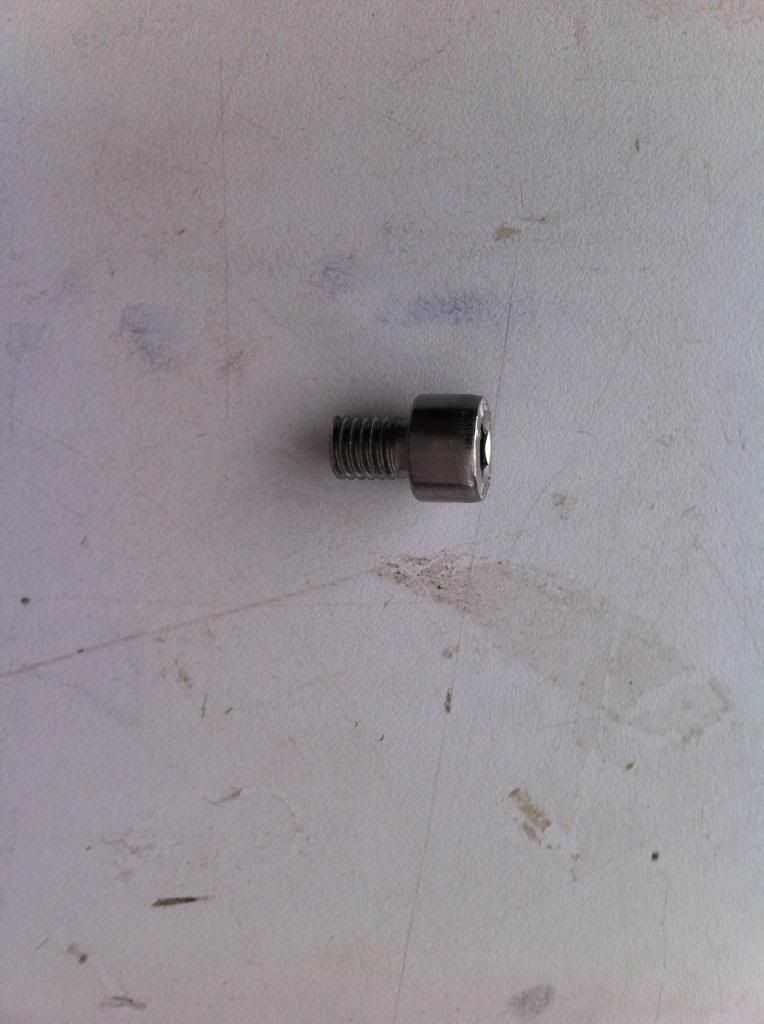
Although the stainless looked alright i really wanted them black, so a splash of primer, some top coat and a bit of lacquer

The phone call came this morning, the armrest was ready. I deliberated over the armrests colour scheme black leather, red leather, two tone etc etc. In the end i went conservative, A while ago i had replaced my hand brake and gear leather so i decided to match them as they were all so close to the armrest. So I gave Mark (leather guy) a spare hand brake gaitor that i had as a point of reference for him. He's come up trumps
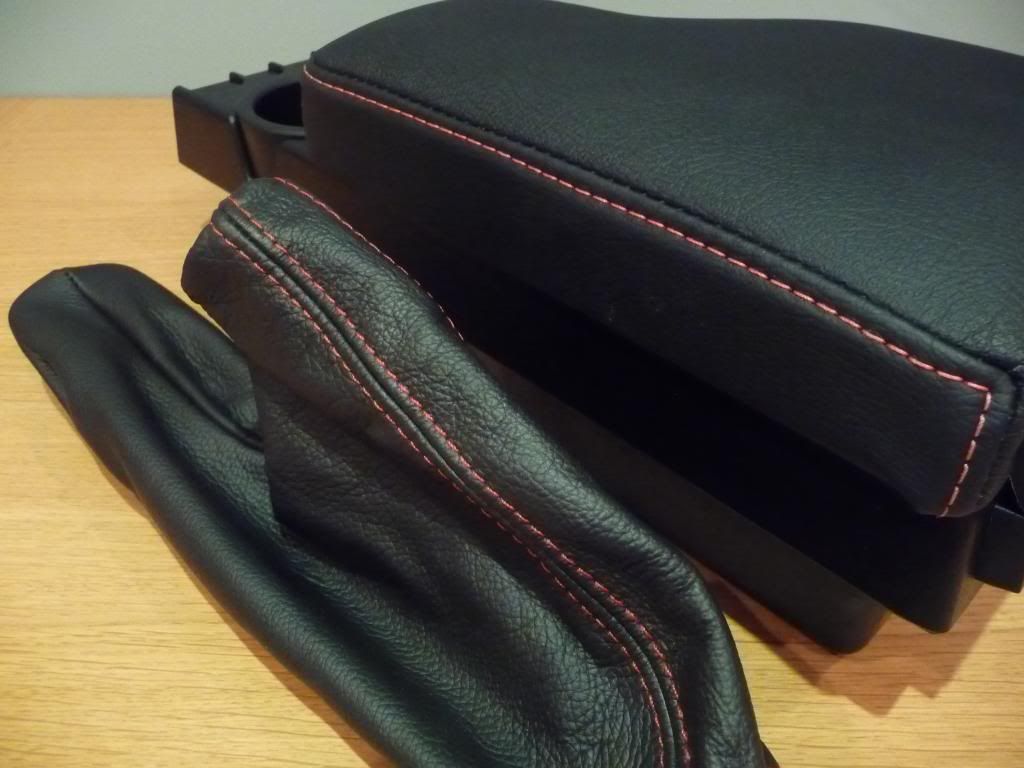
I just needed to mark and drill the remaining two holes n the cup holder to allow me to bolt the upholstered part in place.
Although the stainless looked alright i really wanted them black, so a splash of primer, some top coat and a bit of lacquer
The phone call came this morning, the armrest was ready. I deliberated over the armrests colour scheme
I just needed to mark and drill the remaining two holes n the cup holder to allow me to bolt the upholstered part in place.
Re: The story so far 2.0ltr Titanium silver
Very nice work on the gills and that armrest looks amazing 
When is it back on the road then?
When is it back on the road then?
2000 BMW Z3 2.8 Titanium Silver Roadster with too many mods to list
Click For 2.0 Progress Journal
Click For 2.8 Progress Journal
Click For 2.0 Progress Journal
Click For 2.8 Progress Journal


Re: The story so far 2.0ltr Titanium silver
yes it looks fabg8jka wrote:Very nice work on the gills and that armrest looks amazing
When is it back on the road then?
Re: The story so far 2.0ltr Titanium silver
g8jka wrote:Very nice work on the gills and that armrest looks amazing
When is it back on the road then?
Cheers
As to when it's on the road? It's MOT runs out at the end of the month so I'll get that done and tax it April - September
It only did 400miles last year
Re: The story so far 2.0ltr Titanium silver
It's worth keeping an eye out for the gills they do come up at the right price every so often. Although at £169 new you have to be careful not to pay over the odds second hand.PCSAM wrote:yes it looks fabg8jka wrote:Very nice work on the gills and that armrest looks amazing
When is it back on the road then?


Re: The story so far 2.0ltr Titanium silver
Looking good Jon, I wouldn't be without the armrest now as it sits just at the right height to rest the elbow when cruising along and the gills can be a pain to remove which is down to the clip that is conveniently behind the bonnet hinge Had to replace the passenger side recently at the badge had corroded 
Tim.
Tim.

2001 Z3 1.9 Roadster Sport - 2012 Z4 sDrive 2.0 M Sport
Re: The story so far 2.0ltr Titanium silver
Cheers Tim, Fitted my new Bosch S5 battery yesterday also, brought a smile to my face when the boot light sprung in to life and then entered the code in to the Becker Cascade. Can't wait to drive it, it's been ages and looking forward to trying out the armrest.TitanTim wrote:Looking good Jon, I wouldn't be without the armrest now as it sits just at the right height to rest the elbow when cruising along
Tim.
You're not wrong about those clips
-
shantybeater
- Joined: Wed 12 Mar, 2008 14:33
- Posts: 1967
-
- Location: UK
Re: The story so far 2.0ltr Titanium silver
Wow fantastic work, good job
Progress Thread:http://www.zroadster.net/forum/viewtopi ... 32&t=36117
Previous - S54 M Roadster, S50 M Roadster, Ibiza Cupra IHI 340bhp, Ibiza Cupra K04 270bhp, 6n2 Polo GTi
Re: The story so far 2.0ltr Titanium silver
Cheers James, it's getting there. Looking at stainless steel exhausts at the mo, not sure whether to stick with twin pipes or go quadshantybeater wrote:Wow fantastic work, good job
Re: The story so far 2.0ltr Titanium silver
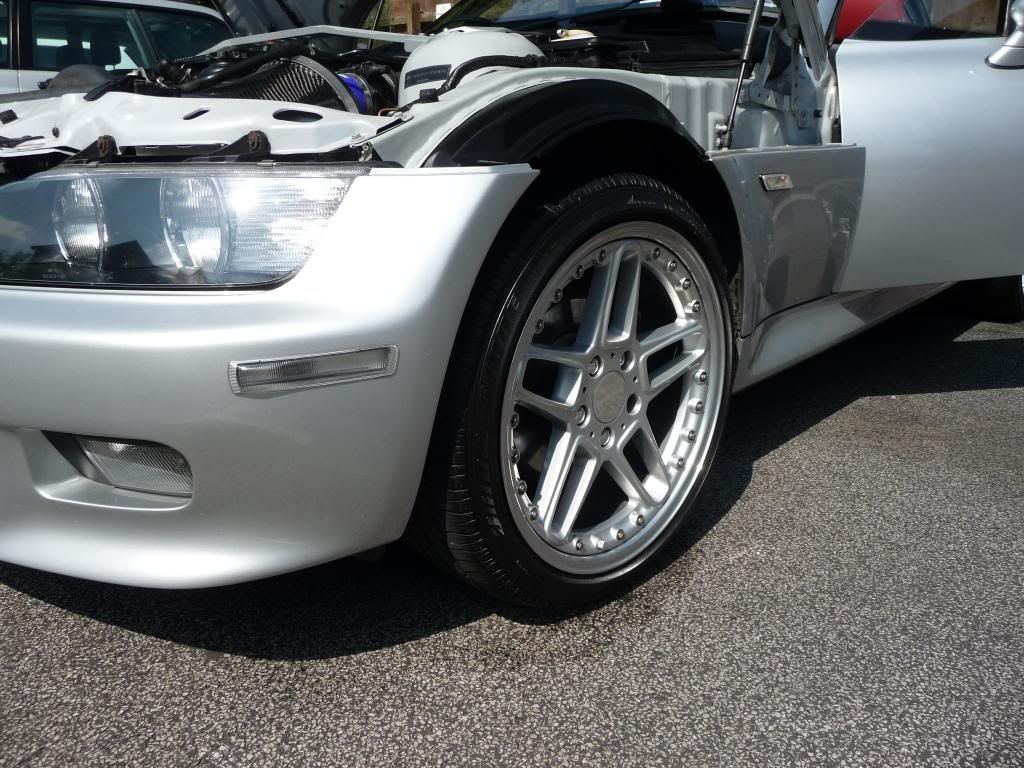
It seems like an age ago that i bought my genuine AC Schnitzer 18" Type 3 racing alloys but there did not seem much point fitting them with the car sorn'd over the winter
The Bridgestone Potenza tyres i just swapped over from my Type 71 clubsport alloys that i had fitted previously. I can't believe how difficult it is to find somewhere to actually swap the tyres over though Many places just aren't interested, stating that they're not allowed When i did find somewhere i think i put the fear of god in him when i told him how much the schnitzers are new, the colour in his face visisbly drained
Anyway i did eventually find somewhere that did it as a favour for my mate who knew him. So a couple of coats of wheel sealant, and some copper grease i was ready to go The pictures aren't great as i only had my iphone and i didnt take the car out of the garage but you'll get the idea.
The car been stood on its original 16" alloys over the winter.
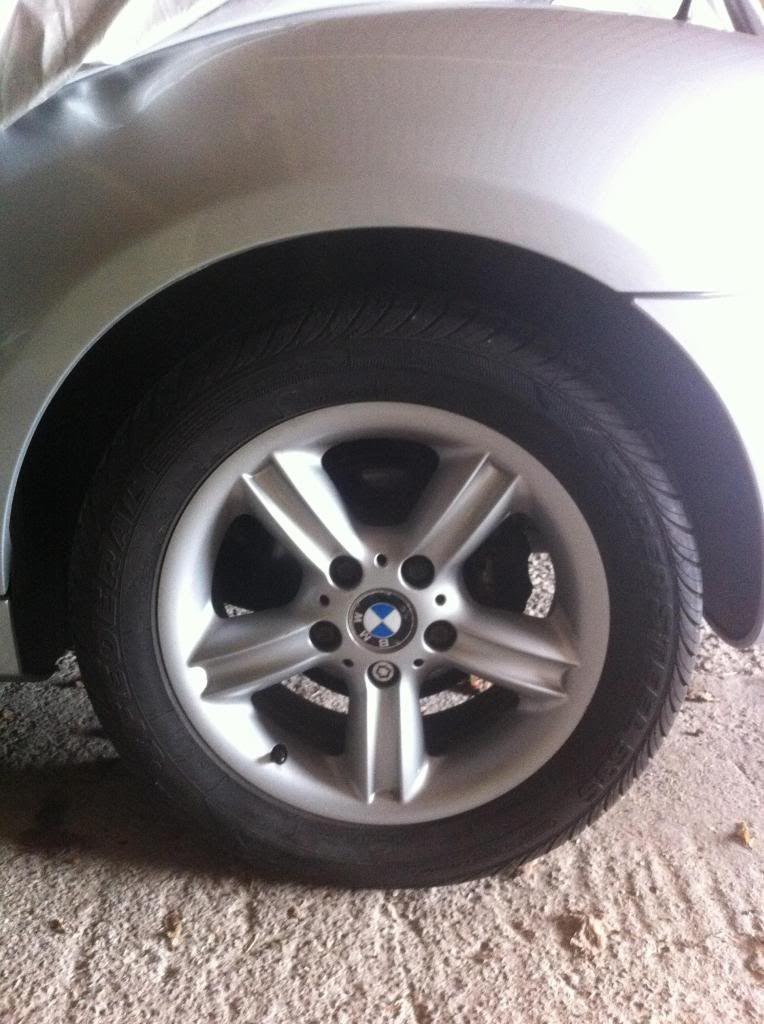
Heres the wheels all ready to be fitted.
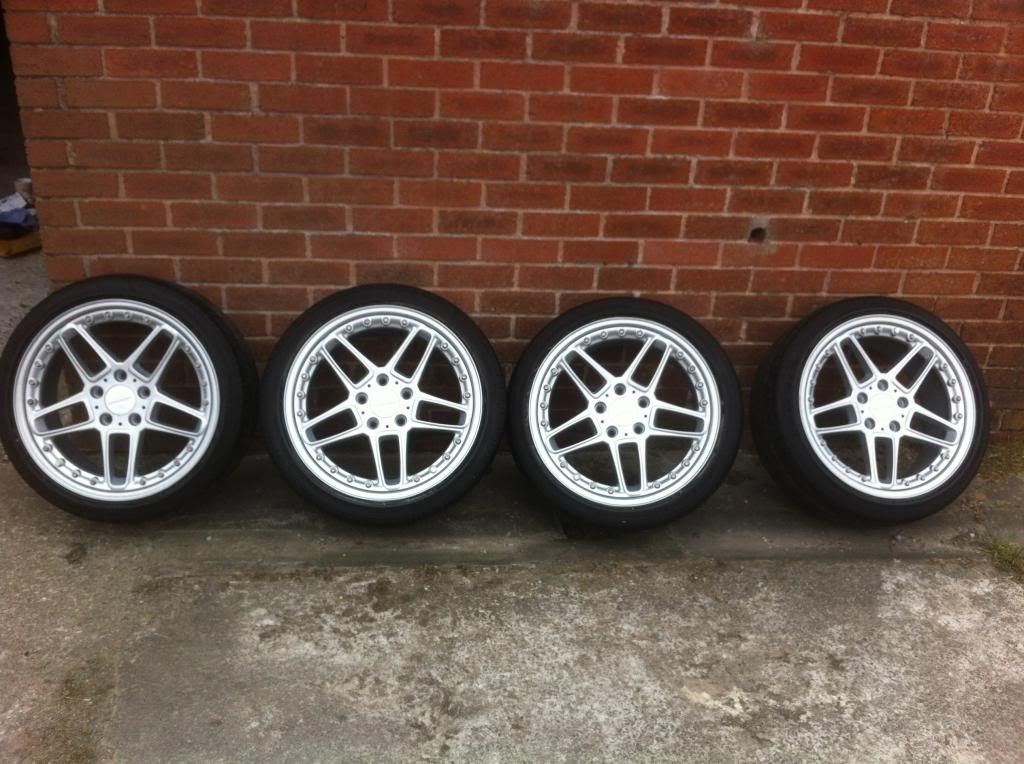
Its so much easier with a decent jack
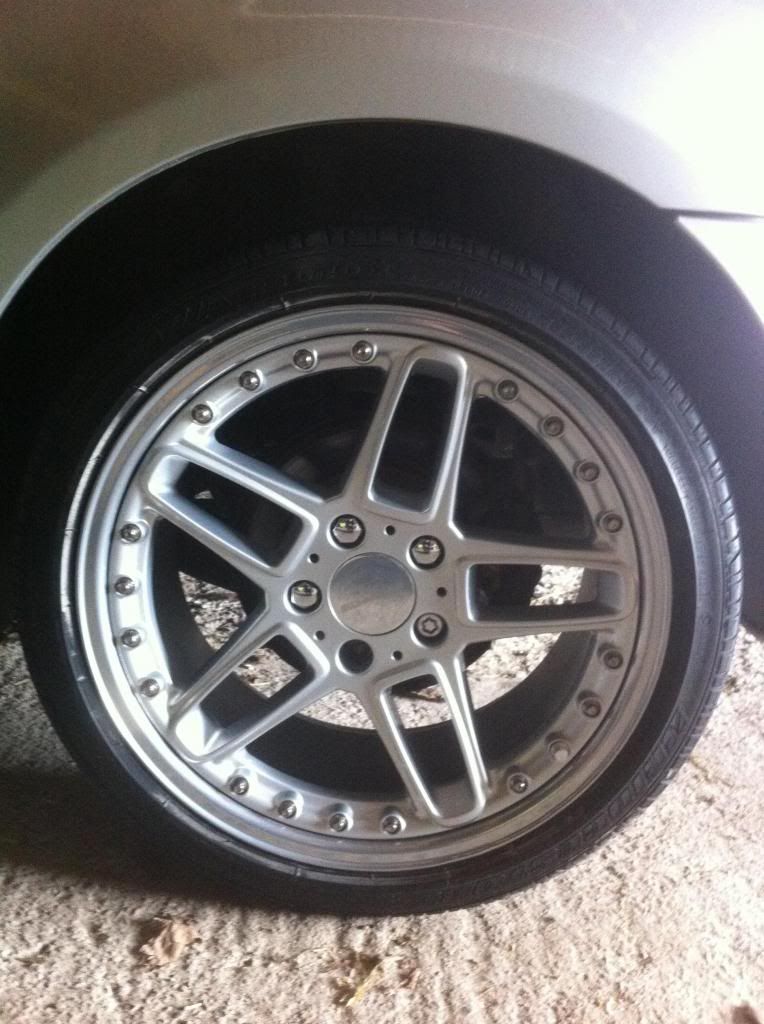
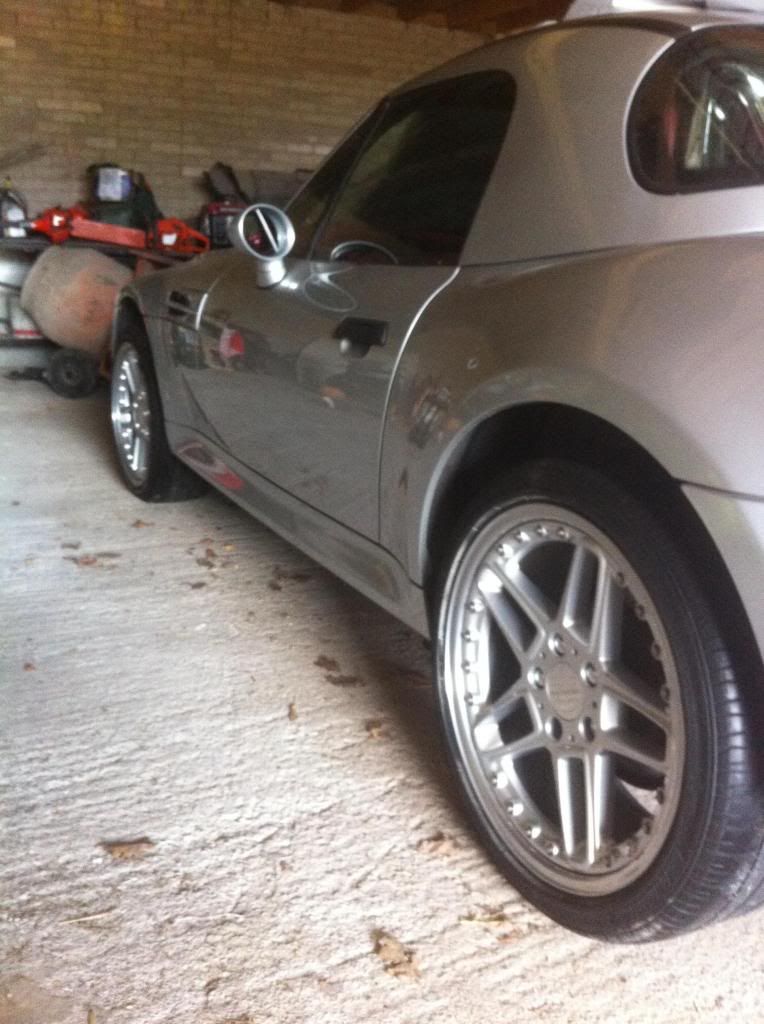
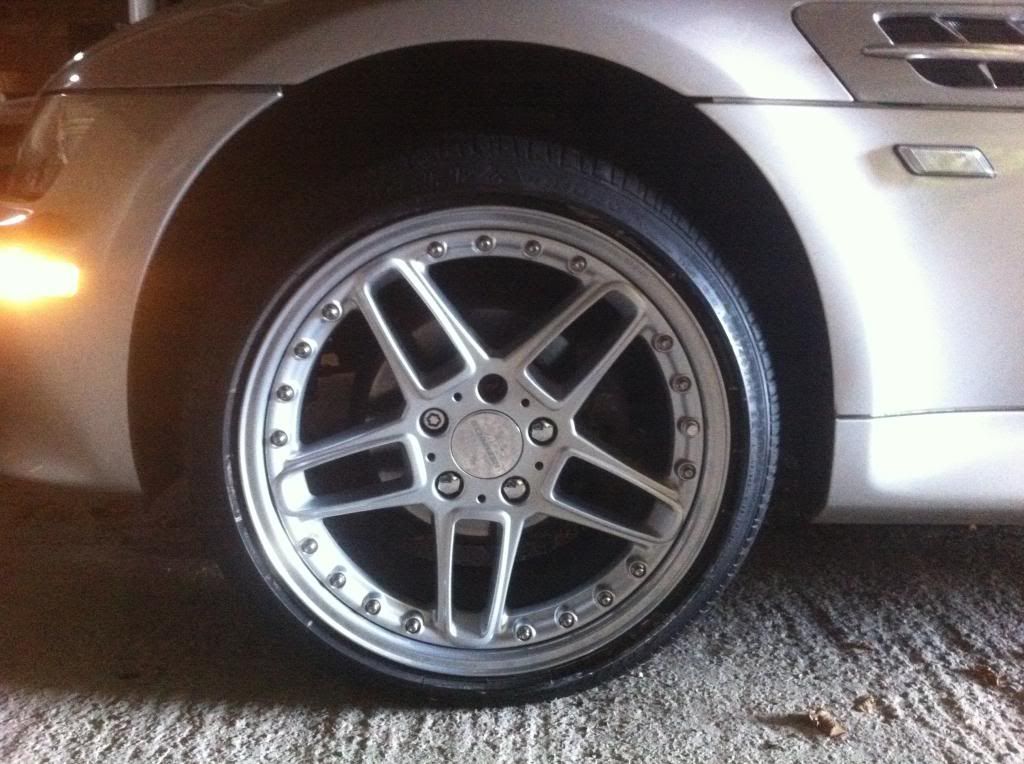
You may of noticed my car has not been lowered And if i'm honest i never thought i wanted to lower it either but with these wheels the car does look like it needs it. So that may well be a job for the winter. The front wheels sit nice and flush with the wheel arch, the rear i'm going to look at getting some 12mm spacers to bring them level.
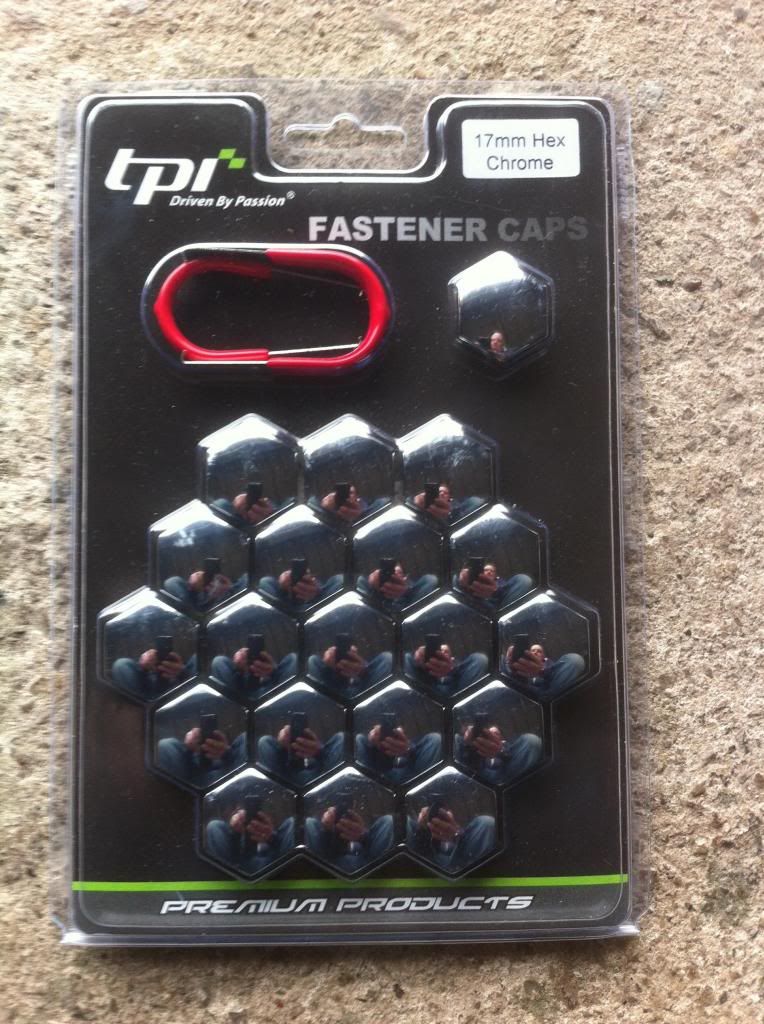
The final job was to fit the TPI chrome caps for the wheel nuts, I have the Mcgard locking wheel nuts as well as the OEM one which i'll replace with the standard nut so i can fit the chrome cap to this one too.
The Bridgestone Potenza tyres i just swapped over from my Type 71 clubsport alloys that i had fitted previously. I can't believe how difficult it is to find somewhere to actually swap the tyres over though
Anyway i did eventually find somewhere that did it as a favour for my mate who knew him. So a couple of coats of wheel sealant, and some copper grease i was ready to go
The car been stood on its original 16" alloys over the winter.
Heres the wheels all ready to be fitted.
Its so much easier with a decent jack
You may of noticed my car has not been lowered
The final job was to fit the TPI chrome caps for the wheel nuts, I have the Mcgard locking wheel nuts as well as the OEM one which i'll replace with the standard nut so i can fit the chrome cap to this one too.
Re: The story so far 2.0ltr Titanium silver
Mods have been at a premium of late partly due to the house move and partly due to the daily driver
I've said it before and i'll say it again NEVER buy a Seat Leon FR
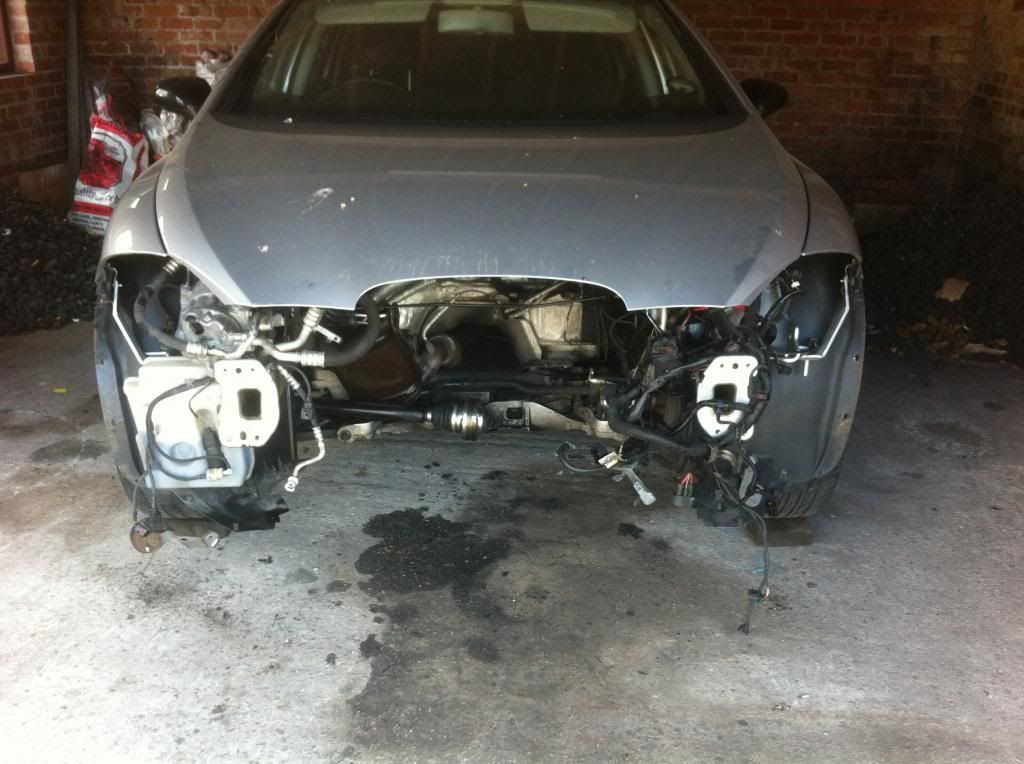
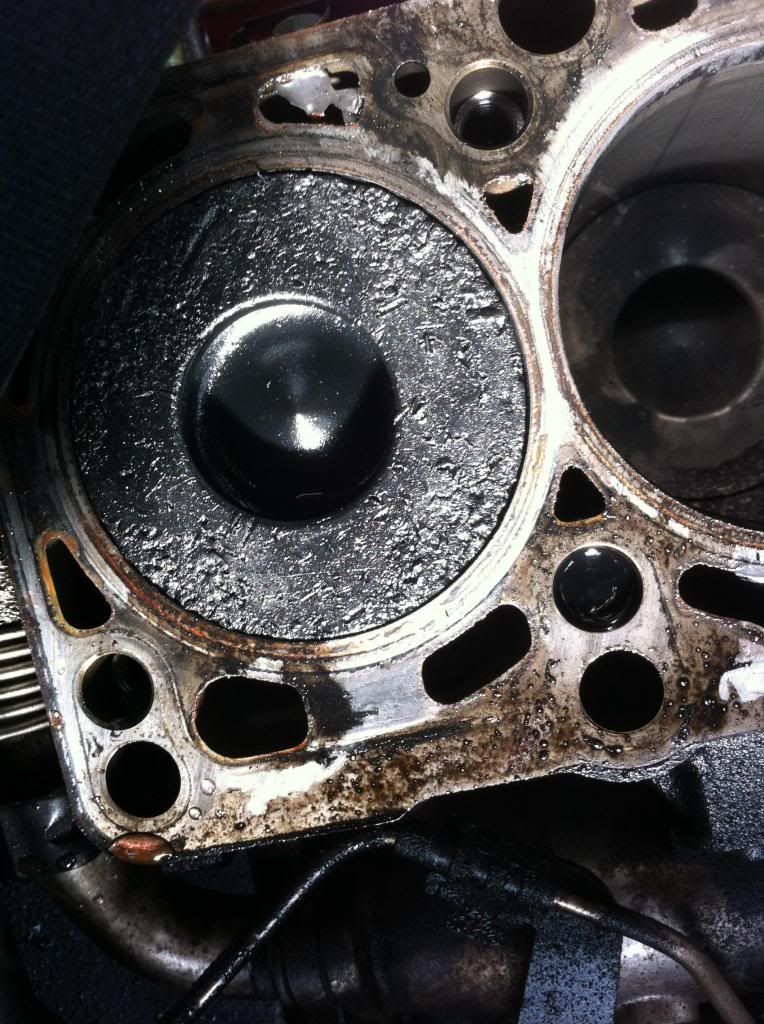
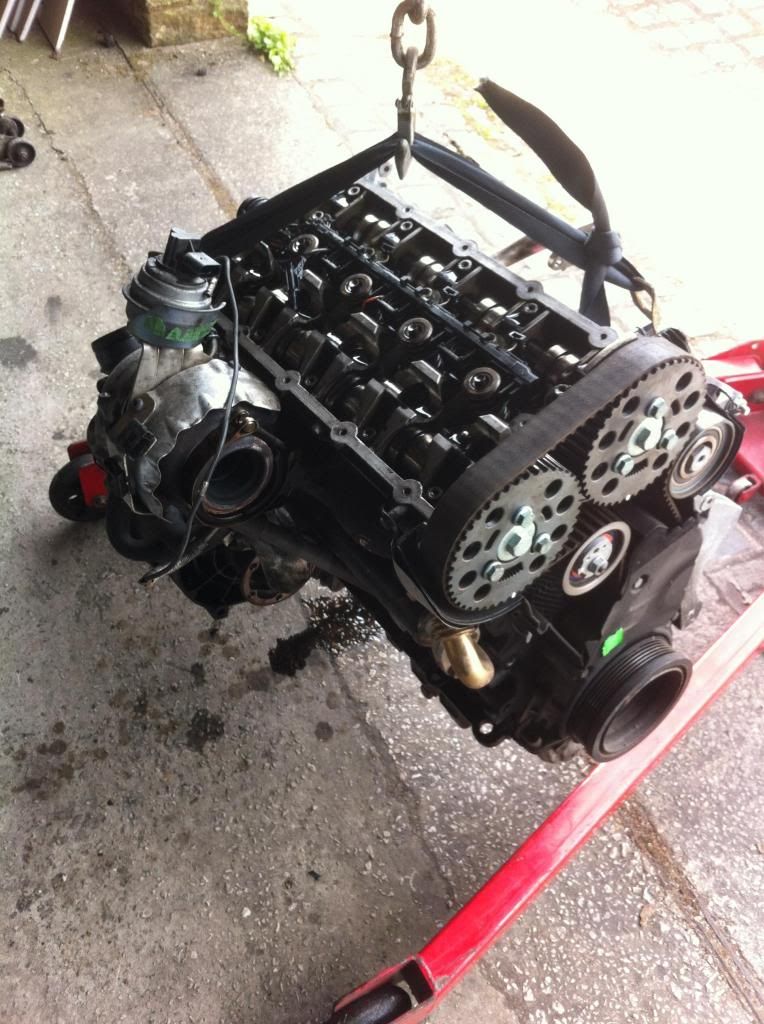
So in a nutshell a new engine was required.
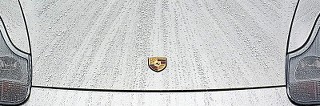
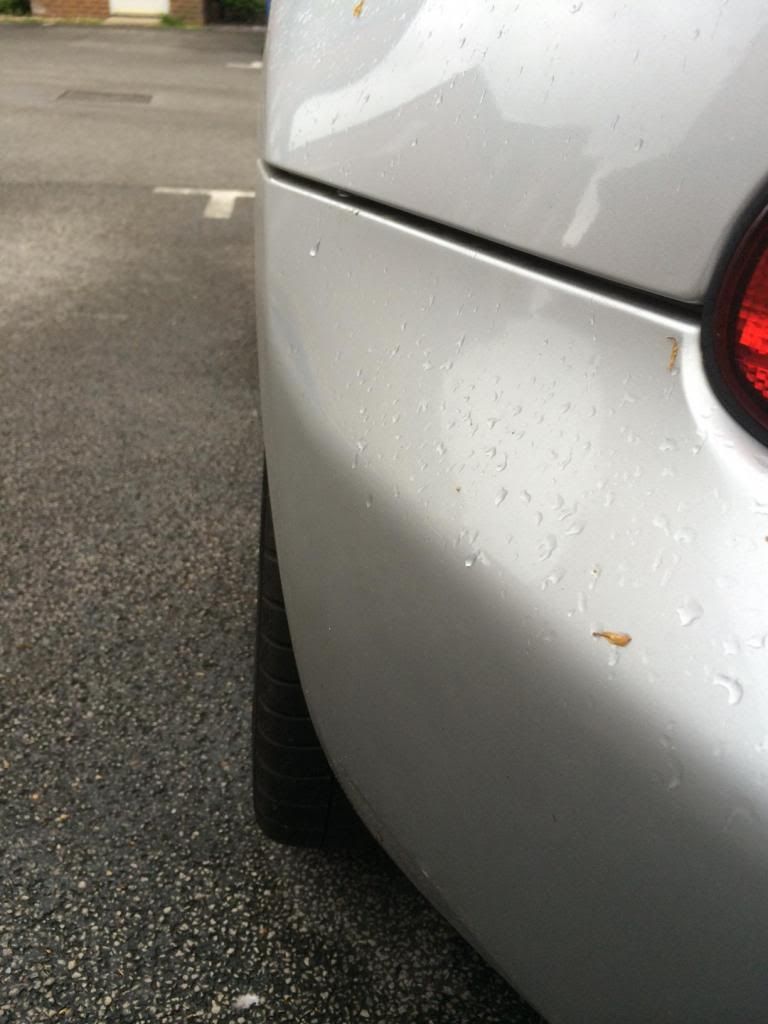
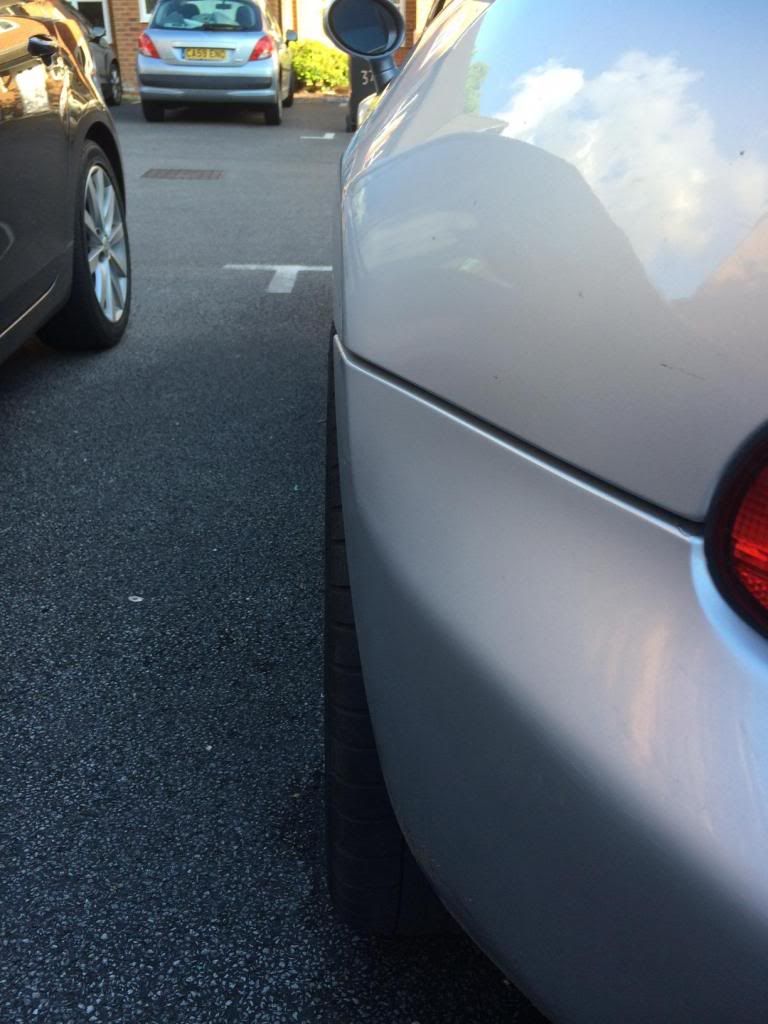
With all this great weather I decided to fit the grey tinted Perspex wind deflector that I made as well as the clear straps to make it look a bit tidier. Now I appreciate it is not that noticeable on the photo but it does look a lot better.
Before
After
And finally a better picture of the ACS wheel fitted.
I've said it before and i'll say it again NEVER buy a Seat Leon FR


So in a nutshell a new engine was required.
With all this great weather I decided to fit the grey tinted Perspex wind deflector that I made as well as the clear straps to make it look a bit tidier. Now I appreciate it is not that noticeable on the photo but it does look a lot better.
Before

After

And finally a better picture of the ACS wheel fitted.

Re: The story so far 2.0ltr Titanium silver
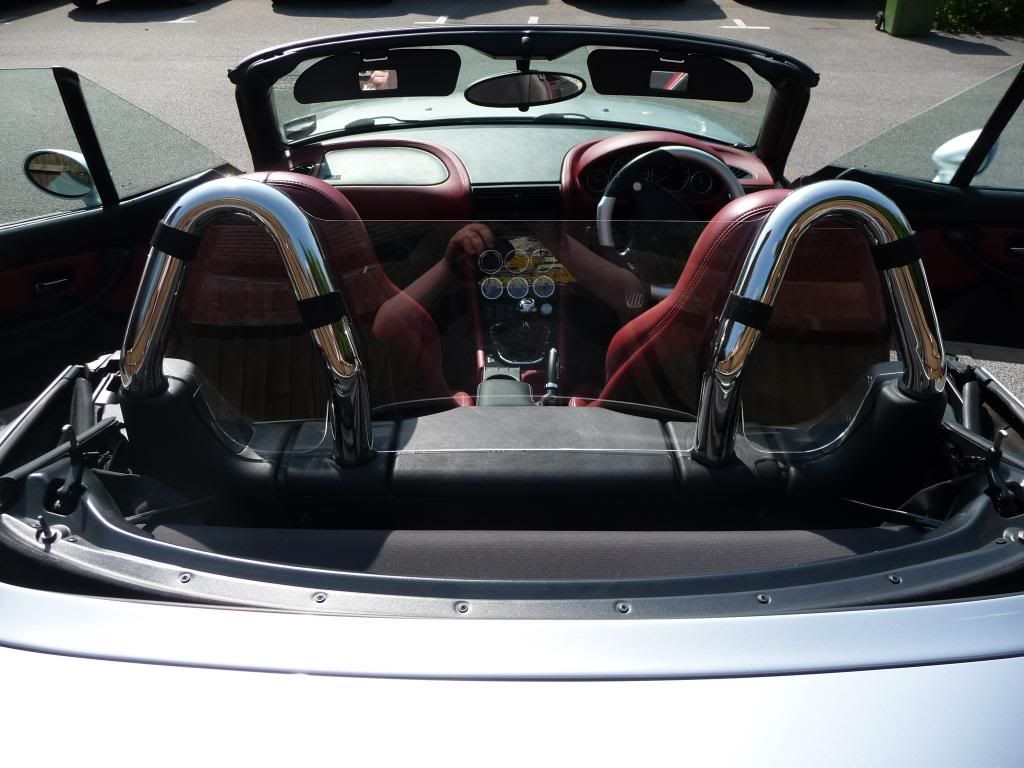
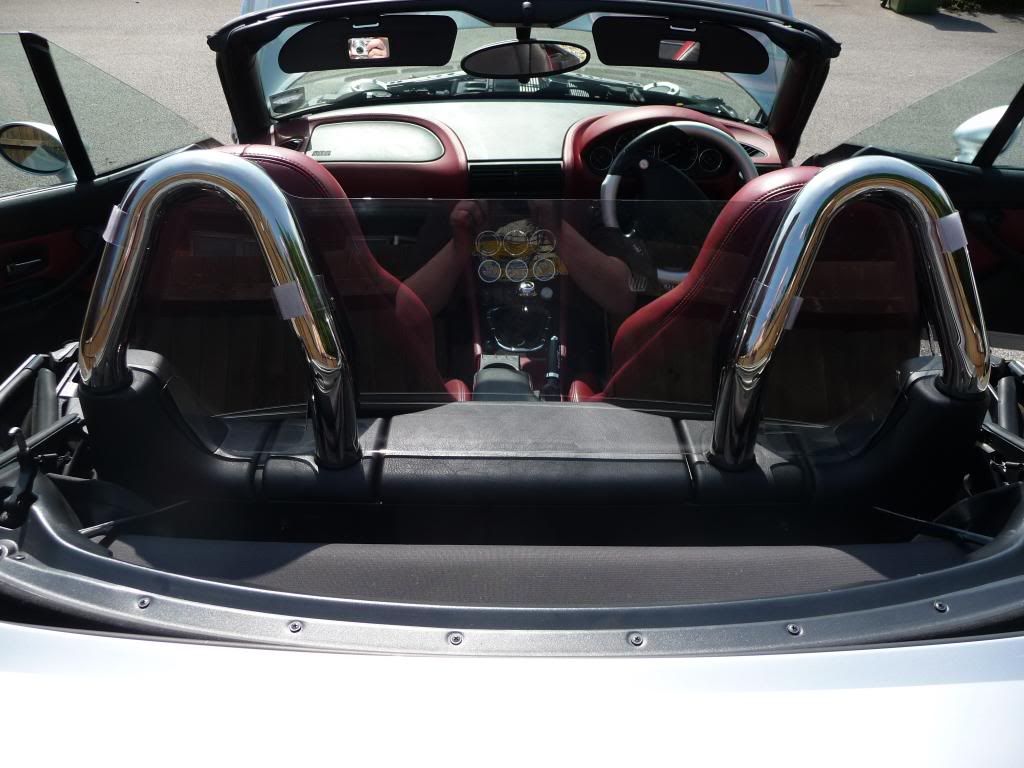
So as some of you will have noticed the Z has a new(ish) purchase which is pretty remarkable considering the Leon situation and the fact that I bought another house last year and have been busy putting an extension on it, new kitchen, bathroom etc etc.
But here it is
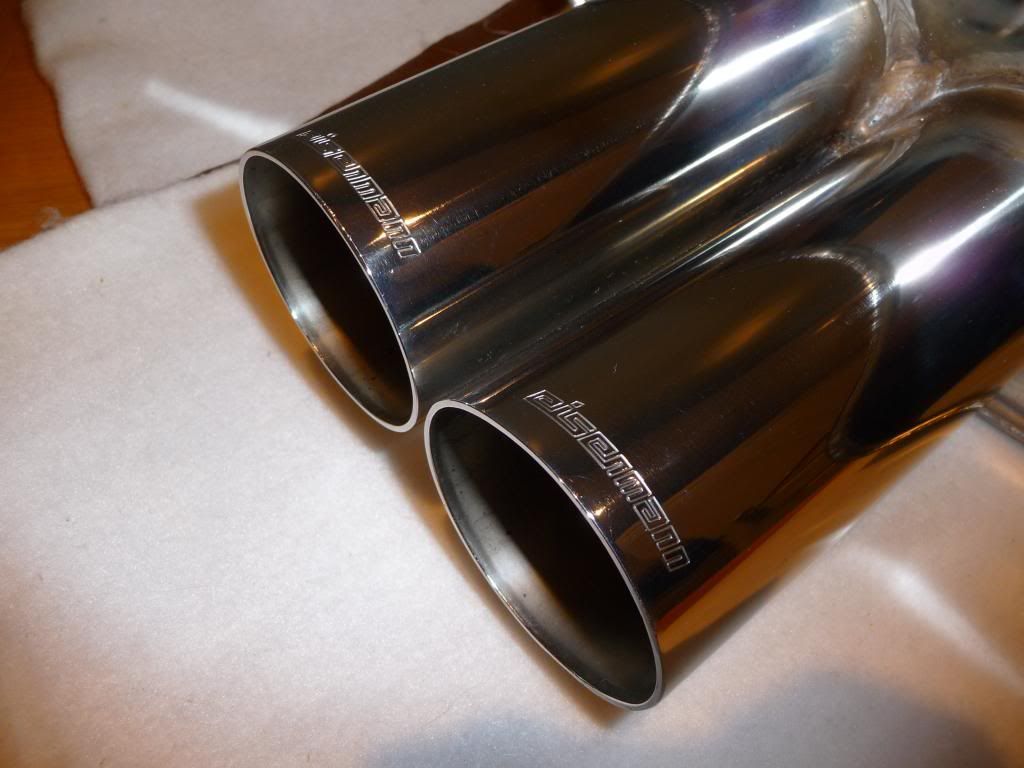
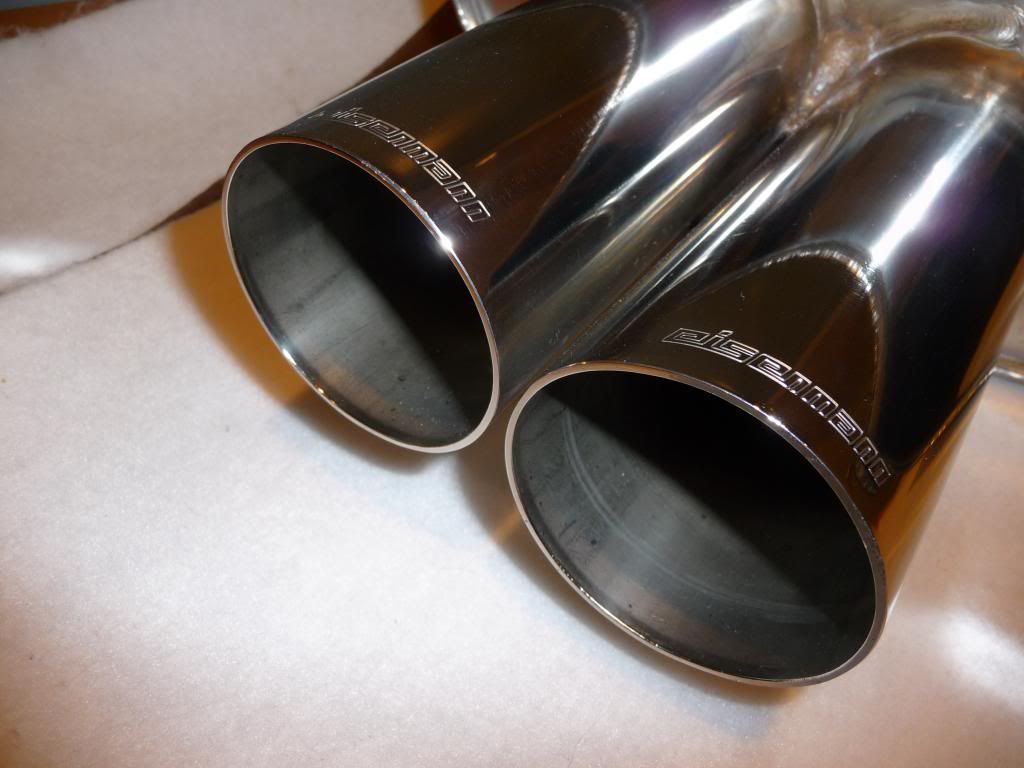
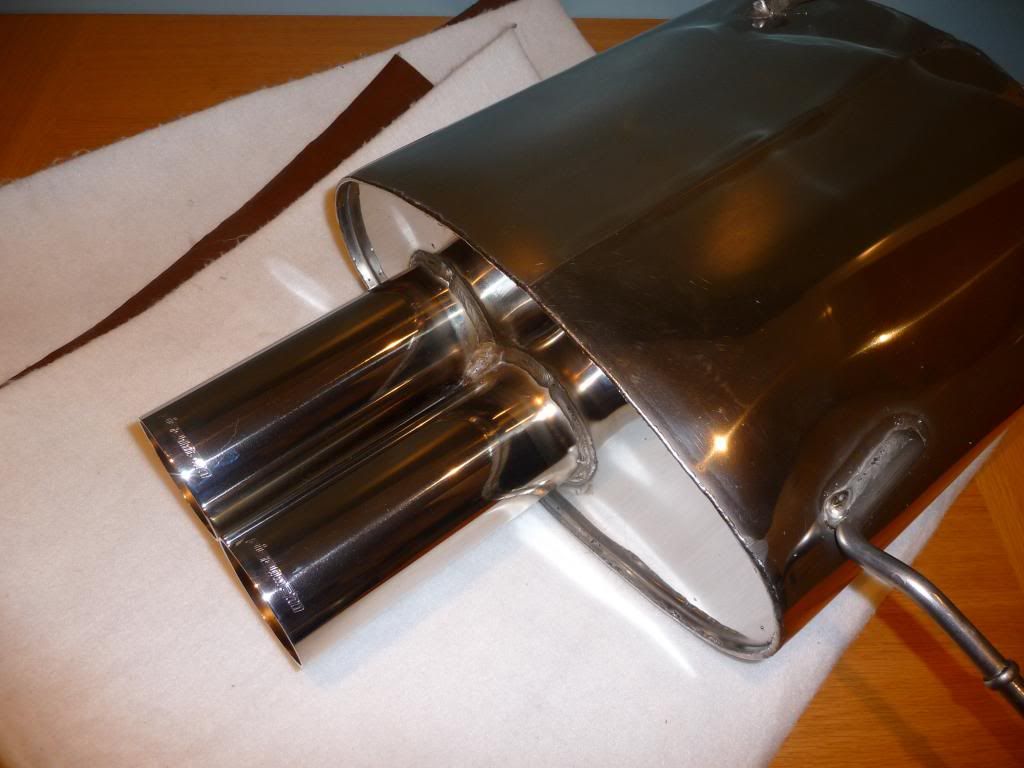
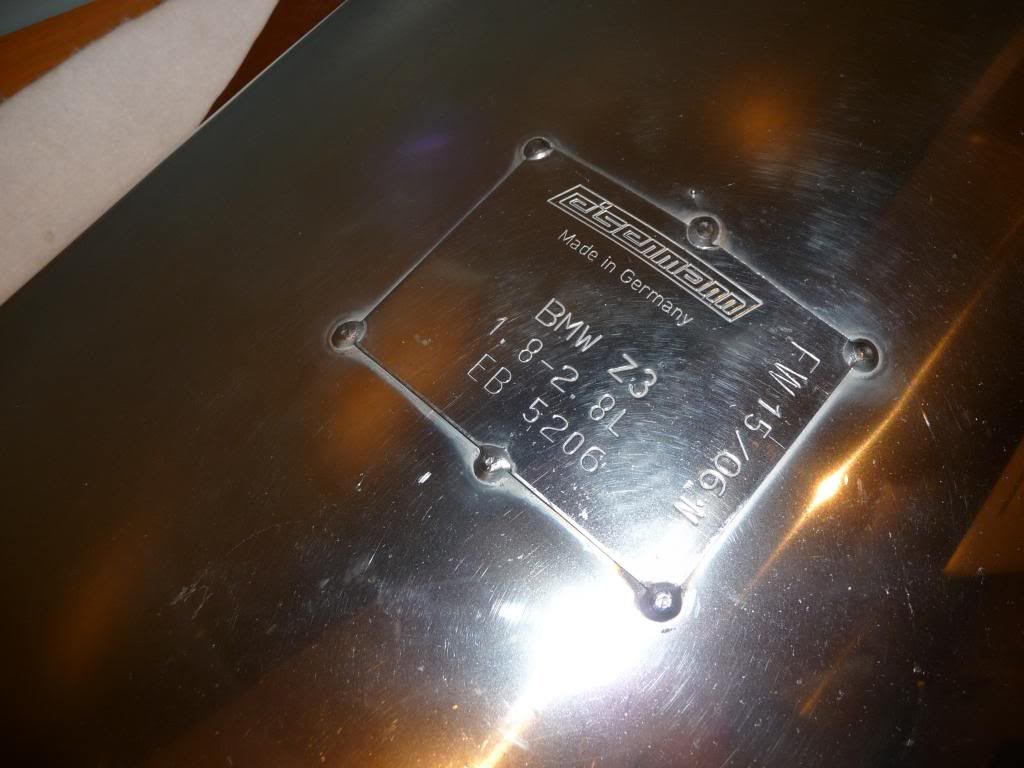
Now again the more observant will recognize the Eisenmann sport exhaust Formerly belonging to Mike Fishwick, then Gazhyde (who narrowly beat me to it) then Gaz's mate had it when he gave his Z to him for a while when it failed its MOT Then Gaz sold it to Andy (Spurs fan in a coupe) who broke the car and sold it to me
It arrived the day before yesterday and i spent the evening on the living room floor with a cloth and a tub of metal polish and its come up a treat. The car is currently Sorn'd so i'll probably wait until its MOT before fitting it.
There is something else to do whilst it's off the road, The Leon has my private reg on Y9 JRH and I really wanted another for the Z to match V9 JRH was perfect as it could go on the Z (year 2000) and was as close to the shape of the Y as possible (sad I know) anyway the Mrs came up trumps for my birthday
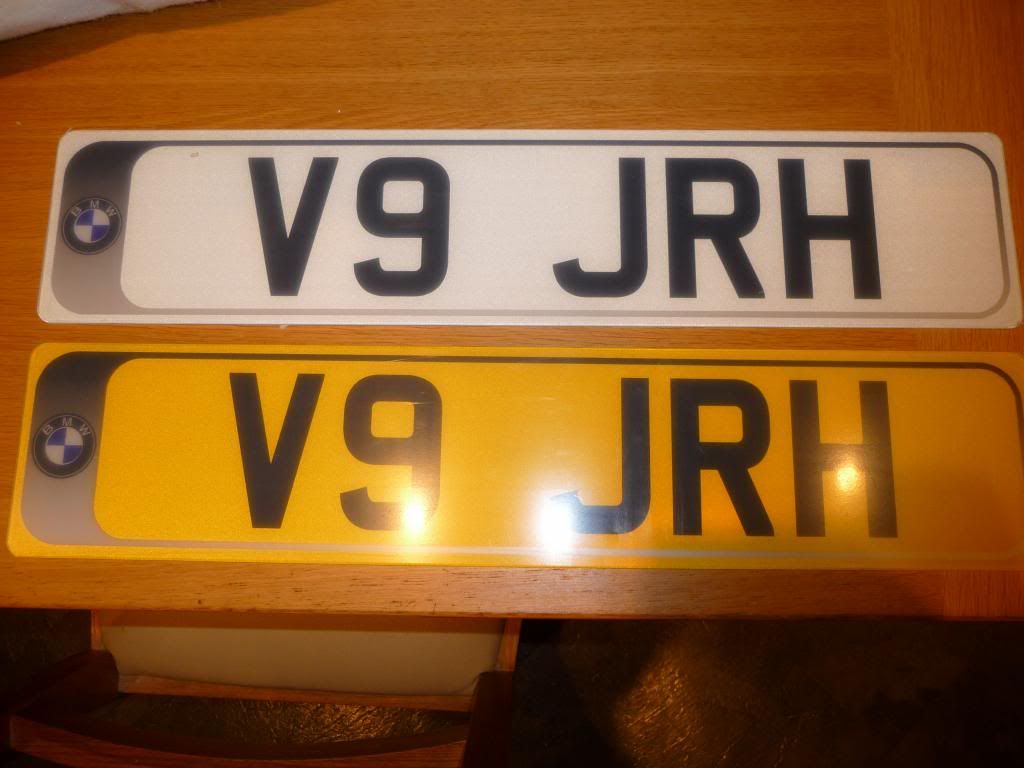
She found it and after some tough negotiating it's mine
But here it is


Now again the more observant will recognize the Eisenmann sport exhaust
It arrived the day before yesterday and i spent the evening on the living room floor with a cloth and a tub of metal polish and its come up a treat. The car is currently Sorn'd so i'll probably wait until its MOT before fitting it.
There is something else to do whilst it's off the road, The Leon has my private reg on Y9 JRH and I really wanted another for the Z to match

She found it and after some tough negotiating it's mine
Re: The story so far 2.0ltr Titanium silver
('_')Z3 wrote:
after some tough negotiating it's mine
Did you ever find your book on fly fishing?
Z3 2.8 Progress Journal (Mine)
Z3 1.9 Sport Progress Journal (Wifey's)
I have an element of 'M-styling' on my car, If that's a good enough reason for the manufacturers to adorn a 320 with the M badge, then its certainly a good enough reason for me..
Re: The story so far 2.0ltr Titanium silver
gookah wrote:('_')Z3 wrote:
after some tough negotiating it's mine
Did you ever find your book on fly fishing?
No, the search continues
Re: The story so far 2.0ltr Titanium silver
So I've only done a few mods recently
I decided to fit the cruise control, probably more out of something to do more than anything else. As others have stated it was all very easy, I managed to sort the stalk from the good old US of A £18 delivered a really good service from them and much cheaper than anything I could source from over here. The interface was from the local stealer, ordered and here by 2pm the next day. The hardest bit was finding the plug under the dash
The Eisenmann I bought from Andy 'Spurs fan' was fitted a couple of months ago by the local indy in Woolston Warrington. At £33 it was hardly worth scrabbling around under the car, it sounds amazing, really really good the only issue is my fuel economy has gone down as I tend to drive around in 3rd gear for full impact Not sure the Mrs likes the sound quite as much as me though
I feel like I'm keeping Andy and his young child in nappies with the stuff I'm buying from him (although I'm not alone). I'd been after a set of rear spacers for my car for a while and then Andy popped up with another 'must have item' 15mm spacers with longer bolts and Mcgard locking bolts. All in all it looks alot better.
Before
After
I have picked up a couple of other small bits to fit, an AC Schniyzer dead pedal, as well as an OEM boxed fire extinguisher and bracket to fit to the passenger seat. Pics to follow
I decided to fit the cruise control, probably more out of something to do more than anything else. As others have stated it was all very easy, I managed to sort the stalk from the good old US of A £18 delivered a really good service from them and much cheaper than anything I could source from over here. The interface was from the local stealer, ordered and here by 2pm the next day. The hardest bit was finding the plug under the dash
The Eisenmann I bought from Andy 'Spurs fan' was fitted a couple of months ago by the local indy in Woolston Warrington. At £33 it was hardly worth scrabbling around under the car, it sounds amazing, really really good
I feel like I'm keeping Andy and his young child in nappies with the stuff I'm buying from him (although I'm not alone). I'd been after a set of rear spacers for my car for a while and then Andy popped up with another 'must have item' 15mm spacers with longer bolts and Mcgard locking bolts. All in all it looks alot better.
Before

After

I have picked up a couple of other small bits to fit, an AC Schniyzer dead pedal, as well as an OEM boxed fire extinguisher and bracket to fit to the passenger seat. Pics to follow
Re: The story so far 2.0ltr Titanium silver
A blast from the past this thread. It's been so long since any updates The car has been stored for a quite a while and has only done 500 miles or so in the last 12months.
So today was the day to finally break her out from under her covers, it burst in to life at the first time of asking. It's MOT had lapsed by quite a few months so I had booked it in for this afternoon. It was such a nice day that it seemed rude not to drive it there with the roof down . Anyway it passed so there a few jobs I want to get done and I'm keen to get the thoughts and opinions of people that know more about these things than I do
Power flex bushes? A mechanic friend has recommended the black ones has anyone got them fitted? Also I'm thinking the shocks would benefit from a refresh, has anyone any experience of the Bilstein B12 pro kit? Like I said thoughts and opinions are greatly received.
So today was the day to finally break her out from under her covers, it burst in to life at the first time of asking
Power flex bushes? A mechanic friend has recommended the black ones has anyone got them fitted? Also I'm thinking the shocks would benefit from a refresh, has anyone any experience of the Bilstein B12 pro kit? Like I said thoughts and opinions are greatly received.
Re: The story so far 2.0ltr Titanium silver
The black Powerflex bushes are not widely available - as far as I am aware they are the "rock hard" ones intended for cars used solely on track. People using their cars on the road, invariably use the purple ones.
Not lowered my own car but I know that the B12 pro-kit is highly regarded consisting of premium Bilstein shocks (firmer than OE) plus the first stage of the Eibach lowered coil springs (pro-kit). The beauty of an established "kit" being that it has been designed/tested to be paired together. I have used the Eibach pro-kit springs on another car (a hatchback) paired with Bilstein B4s (OE equivalent) and the car was just very slightly lower with a beautiful ride which I put down to the progressive design of the springs i.e. the end coils are thinner than OE and the middle fatter, so the ride over slight bumps and undulations was slightly firmer but still comfortable. The fatter coils would come into operation when the car is being driven in a more sporty context such as a track day outing. Cheap lowering springs have a reputation for giving a harsh ride.
Not lowered my own car but I know that the B12 pro-kit is highly regarded consisting of premium Bilstein shocks (firmer than OE) plus the first stage of the Eibach lowered coil springs (pro-kit). The beauty of an established "kit" being that it has been designed/tested to be paired together. I have used the Eibach pro-kit springs on another car (a hatchback) paired with Bilstein B4s (OE equivalent) and the car was just very slightly lower with a beautiful ride which I put down to the progressive design of the springs i.e. the end coils are thinner than OE and the middle fatter, so the ride over slight bumps and undulations was slightly firmer but still comfortable. The fatter coils would come into operation when the car is being driven in a more sporty context such as a track day outing. Cheap lowering springs have a reputation for giving a harsh ride.

Re: The story so far 2.0ltr Titanium silver
I'm just totally in awe,you're doing a fabulous job on your car. Not seen one of those Raid wheels,a few people I know have the Royal up grade which I like.Is the price similar? Also , how does the gear knob compare with a Storm, presumably it is similarly heavy?
-
spurs fan in a coupe
- Joined: Fri 18 Apr, 2008 19:24
- Posts: 1446


- Location: woking
Re: The story so far 2.0ltr Titanium silver
Car looks awesome mate.
Glad you're still going strong on Spurs Fan fuel!
That's a lovely exhaust note.
Glad you're still going strong on Spurs Fan fuel!
That's a lovely exhaust note.
we expres: " He did hear the bells ringing, but doesnt know where where the clapper hangs".